Installing WordPress in subdirectory lets you run multiple WordPress information under the same domain. Installing WordPress in a subdirectory is very simple if your web host uses cPanel with easy scripts. As cPanel is also known as control panel which is basically a web hosting panel based on Linux system and provided by many hosting providers.
These software programs enable fast and simple WordPress installation. Otherwise, you’ll require to install WordPress to your subdirectory manually or move to a new web host.
In this article, we will show you how to install WordPress in subdirectory or root.
What Are Subdirectories and Why should You use them?
It is another name for a nested folder. For example, If you want to save photos of puppies to your Image folder, you have to set up a subdirectory called Dogs inside and the same process implements to WordPress sites.
Technically, nothing is stopping you to use the same WordPress installation for running a website that includes a blog. But it is easier to use subdirectories to set up different installations when you’re running a huge operation. Below are some other examples of cases where using subdirectories makes sense:
- You want to run an online store on your website. It’s cleaner to set up a WooCommerce install or whatever e-commerce plugin you use in its own subdirectory for avoiding confusion.
- Here, plugin is defined as a type of software that contains a group of functions that can be added to a WordPress website. They are used to provide additional functionality to your application.
- For multilingual websites. If you want to show your website in multiple languages, it makes sense to create subdirectories for each of them. When you require using two various Content Management System (CMS). If you want to know about the best CMS then have a look at our article Best Content Management System. In case you need to run a website on WordPress, but use WooCommerce for your online store.
- As, CMS is a system which allows users to easily create, edit, organize and publishing content. It is one of the most widely used and easy to use content management system which gives many facilities to users. It facilitates the user in creating, editing, organizing and publishing the content on the web servers.
Subdirectories allow you to set up WordPress installations you can use as staging sites via the same domain.
Comparison between WordPress Subdomain and Subdirectory? (Which One is Better for SEO)
In most of the cases, you would want to start a WordPress website with its own domain name. But, some of the times you may want to create additional websites with the same domain name.
So this can happen by either installing WordPress in a subdomain (http://newebsite.example.com) or as a subdirectory (http://example.com/newwebsite/).
Search engines treat subdomains variously from root domain name and let them rankings as a fully different website.
The simplest way to create separate WordPress sites in subdomain or subdirectory is by installing WordPress multisite network. While running a multisite network has its own benefits sometimes a single site may outgrow the network and require its own space.
You can install various instances of WordPress to keep two websites managed individually.
Let’s see:
How to install WordPress in subdirectory?
Step 1. Creating a Subdirectory under The Root Domain Name
- Create a subdirectory under your root domain name and you will install WordPress files here.
- After that connect to your WordPress hosting account via FTP client or File Manager in cPanel. FTP stands for File Transfer Protocol. it is used to transfer files from one local computer to a remote website, such as a WordPress blog.
- Then move ahead to the root folder of your site. Mostly it is the /public_html/ folder. You can see your WordPress files and folders there if you previously have WordPress installed in the root folder.
- Next, right click and select ‘Create new directory’ from the menu.
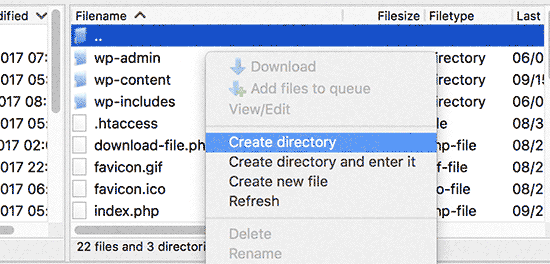
- You are required to be sincere while selecting the name for your subdirectory. This will be part of your new WordPress site’s URL and what your users will type in their browsers to influence this website. Like if after naming this to travel-guides, in this case, your WordPress website’s address will be: http://example.com/travel-guides/
Step 2. Upload WordPress Files
Modifying the newly created subdirectory by uploading WordPress files.
- Firstly visit WordPress.org website and tap on the download button. Your browser will now download the zip file containing the latest WordPress software to your computer.
- After downloading the file, select and extract it. Mac users can double-click the file to extract it and Windows users should right click and then choose ‘Extract All’.
- You will see ‘WordPress’ folder holding all the WordPress files. And now Upload these files to your new subdirectory.
- Using an FTP client connect to your Website and move ahead to the subdirectory you created in the first step. In the local files panel of your FTP client go to the WordPress folder you just obtained. As the FTP client is a software that helps users to transfer your files from your web server.
- Where, Web server is a software which receives your request for accessing a web page. It runs only a couple of security checks on your HTTP request and takes you to the web page.
- Choose all files in the WordPress folder and then upload them to your new subdirectory.
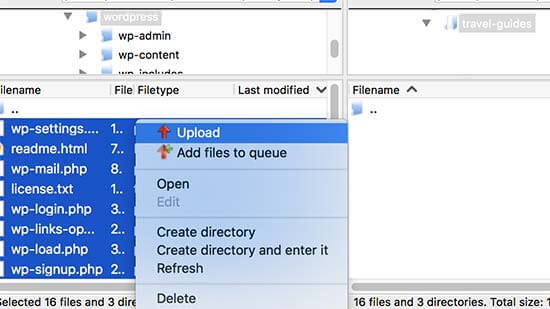
Upload Files – Install WordPress in Subdirectory
Step 3. Create New Database
WordPress saves all your content in a database. Just create a new database to use with your new WordPress site installed in a subdirectory.
- Firstly login to the cPanel dashboard of your WordPress hosting account. Click on ‘MySQL Databases’ under the databases section.
- MySQL, as an open source database management system to store and retrieve all of the website’s information. MySQL in WordPress is a central component in the LAMP stack of open source web application software which is used to create websites where LAMP stands for Linux, Apache, MySQL, and PHP.
- LAMP is used on Linux servers, LAMP which stands for Linux, Apache, MySQL, and PHP.
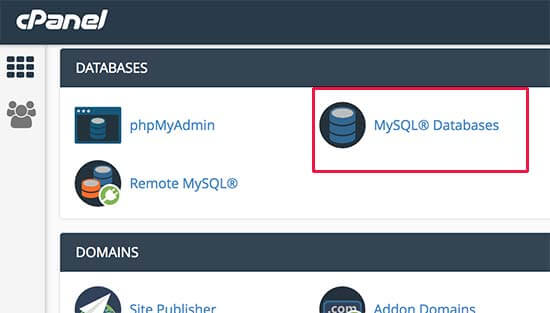
- You need to provide a name for your new database and then tap on ‘Create Database’ button to continue on the next screen. Your cPanel dashboard will create the new MySQL database. Just create a MySQL username in order to use this database.
- Just Scroll down to MySQL Users section and give a new username and password. Click on ‘Create User’ button to continue.
- Scroll down to ‘Add user to database’ section, select your MySQL username and then choose your newly created database.
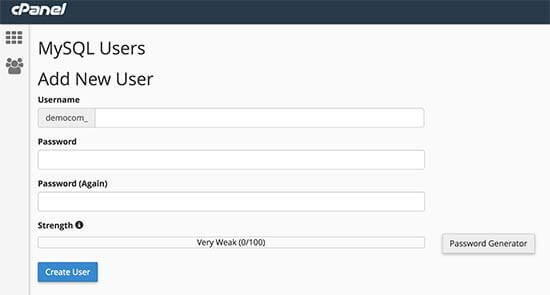
- Next Click on Add button to continue. Now, cPanel will allow the MySQL user full authority on your newly created database.
Step 4. Install WordPress
- Now you can install WordPress. For this visit the WordPress directory you created earlier in a web browser by typing the URL like this: http://example.com/your-subdirectory-name/
- This will show the WordPress installation wizard. Choose the language for your WordPress website and tap on the continue button.
- Next, give your WordPress database name, database username, password, and host. Enter the database information and click on the submit button.
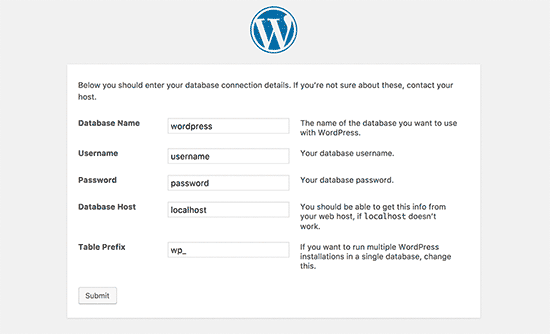
- Now WordPress will connect to your database and you will see a success message like this:
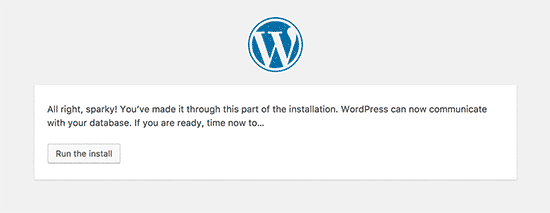
- To continue to click on ‘Run the install’ button.
- You will be asked to provide a title for your website and choose an admin username, password, and email address on the next screen.
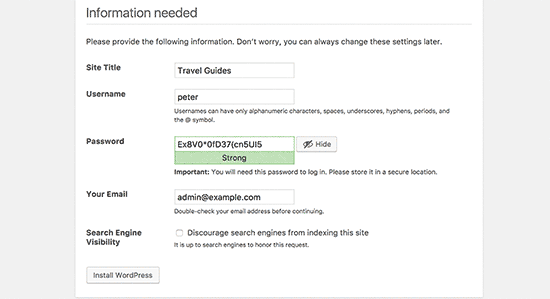
- To continue to click on ‘Run the install’ button. WordPress will now build your website and will display you a success message:
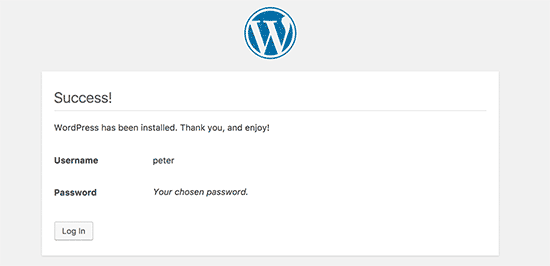
- You can now log in to your new WordPress website installed in the subdirectory.
Read More: Installing WordPress Locally on Your MAC using MAMP
Step 5. Fix Permalinks
For the next step, you have to fix the Permalinks. As Permalinks are the permanent URLs of your individual weblog posts, as well as categories and other lists of weblog postings.
In case you having a separate WordPress install in the root directory, then the .htaccess files of your subdirectory will cause a clash. The .htaccess (hypertext Access file) is the configuration file of a website.
This configuring file used to run Apache Web Server software. Any alteration in this file can cause an error. This will result in 404 errors on your website.
For fixing this edit the .htaccess file in your subdirectory WordPress install. Just replace the code inside your .htaccess file with the below given code:
| # BEGIN WordPress
<IfModule mod_rewrite.c> RewriteEngine On RewriteBase /your-subdirectory/ RewriteRule ^index\.php$ – [L] RewriteCond %{REQUEST_FILENAME} !-f RewriteCond %{REQUEST_FILENAME} !-d RewriteRule . /your-subdirectory/index.php [L] </IfModule># END WordPress |
- At last, replace /your-subdirectory/ with your own subdirectory name.
WRAPPING UP
While managing multiple WordPress sites on the same web server, making your installs well organized is necessary, specifically if you look at client sites. Or maybe you just don’t like installing WordPress in the root of your website.
Whatever the case may be, installing WordPress in a subdirectory gives a clean solution. We hope that this article helped you in installing WordPress in a Subdirectory.
We have a team of skilled WordPress experts who will help you to resolve your issue related to Install WordPress Theme, dial our Toll-Free number +1-888-738-0846.
