

Are you willing to know how to add Dummy Content to a WordPress Website? It’s always exciting to install WordPress and your favourite theme on a fresh domain. After just a few minutes of setup, you’re sat looking at an attractive, unrestrictive blank canvas that you can mold into any type of website. The only limit is your fantasy.
Here, theme is a group of stylesheets and templates that are used to describe the appearance and display of a WordPress site. A WordPress theme changes the layout & design of your site. And Templates are those files which control how your WordPress site will be displayed on the Web.
However not every WordPress user wants a blank canvas. This is generally true if you’ve selected your theme because you liked the theme demo. After installation, your website will look nothing like the demo.
In case you are an inexperienced WordPress user, this can be uncommonly irritating. You can spend hours just trying to find out how to get your site resembling the demo you fell in love with.
There is a fast solution to this situation though and many theme developers are catching on to it that is dummy content. So let’s have a brief look at what is it and how to add Dummy Content to a WordPress Website.
See Also: Complete Guide: Add A Directory To Any WordPress Website
What is Dummy Content?
A WordPress theme is nothing without content. As you’ve possibly realized if you install a theme on a fresh WordPress installation there is no content just a single post, page, and comment.
As, The articles posted by the admin of a WordPress site are called posts and pages are like posts. Pages can be managed in a hierarchical structure in WordPress.
With no content to work with the good WordPress theme can look lifeless.
Dummy content is a rapid fix to this problem as the Dummy content takes the form of a simple XML file. Within this file loads of demo content that you can use to occupy an empty website.
Nowadays most of the premium WordPress themes ship with dummy content. While uploading the dummy content file to your site, you are adequately uploading the same pages, posts, images and settings you saw in the demo. The dummy content can make your website look just like the theme demo you fell in love with in just seconds.
This has a specific advantage over building your website from scratch. The dummy content displays all of the theme’s premium features with zero configuration on your part. After you have decided which to bin and which to keep you can go about replacing images and rewriting the text to make your website your own.
How to Install Dummy Content?
Let’s have a look at how to install Dummy Content to WordPress:-
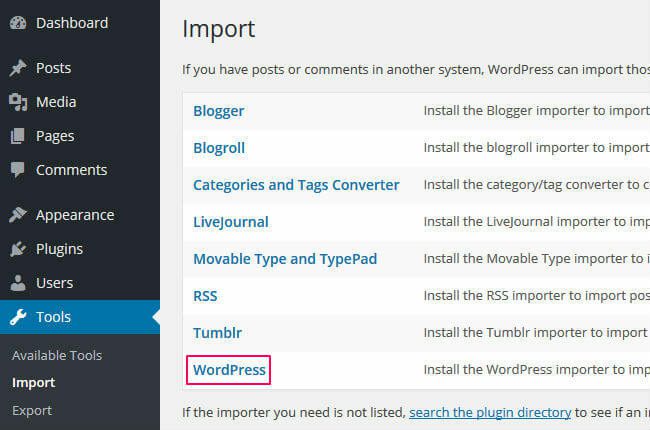
After logging in to WordPress navigate to Tools > Import. This screen will show entire WordPress tools to help you fastly import a lot of data.
For importing dummy content you’ll require choosing the WordPress option.
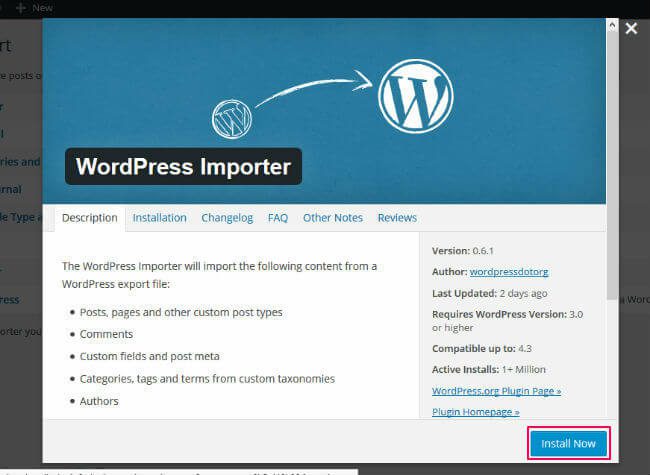
A pop-up window will visible letting you to quick-install the WordPress Importer plugin. Click the Install Now button.
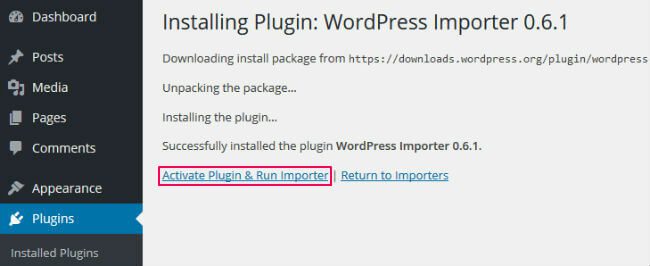
Once the Plugin is installed and downloaded, click the Activate Plugin & Run Importer button.
If you don’t know how to install it see our step by step instructions on how to install a Plugin in WordPress.
You’ll be able to upload your dummy content straight away with the plugin installed and activated. A plugin is defined as a type of software that contains a group of functions that can be added to a WordPress website. They are used to provide additional functionality to your application.
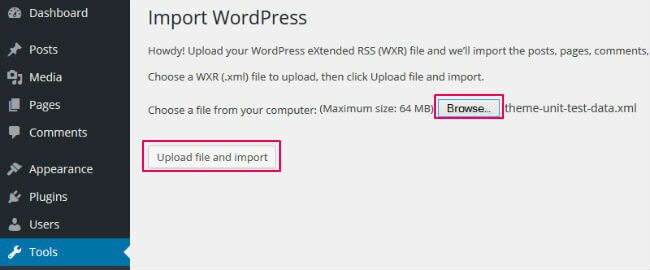
After that hit the Browse button then search your hard drive for the appropriate dummy content XML file. Click the Upload file and import button when you’ve found and opened it.
The last step is to assign an author to the posts and pages. Until your username matches the one from the dummy content you’ll view a screen that looks like this:
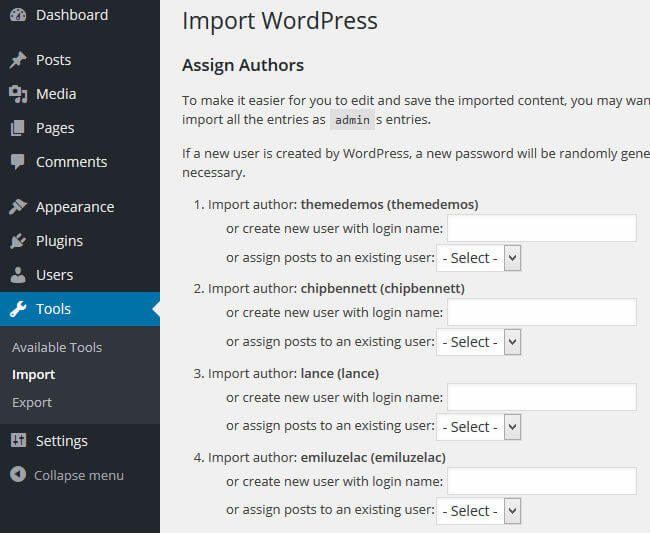
This is due to WordPress is trying to assign authorship to users who don’t exist on your site. As each post requires an author you’ll have to re-assign the dummy content posts to an existing WordPress user.
I’d suggested assigning everything to the admin account because the admin has permission to do everything on the website without any regulation. Relying on a user’s permission levels some users may not be able to upload content to certain restricted areas.
If you’d prefer to assign them to a new user just type the name of your new user in the box alternatively choose an existing user from the drop-down menu.

Next, at the bottom make sure you’ve got the Download and import file attachments box ticked. Click the Submit button. Now when you try to see your website, you’ll be acknowledged with a website full of demo content.
How to add Dummy Content via WordPress Theme Unit Test Data
Firstly download the XML file for theme unit test data. After that go to Tools » Import in your localhost development environment. The localhost in WordPress is the default name which describes local computer’s address also called as the loopback address. where the loopback these addresses enable the Server and Client processes on a single system to communicate with each other.
On the Import screen tap on WordPress and a new popup window will show. You will be asked to install the WordPress importer plugin. Once you have installed and activated the plugin you will be redirected to the importer asking you to upload a WXR (.xml) file.
Next upload the XML file you downloaded earlier. After that on the next screen choose the authors you wish to import and download attachments. Now the importer will import the data from XML file to WordPress. Finally, preview your website to make sure that all new content is there.
Concluding Remarks
Installing dummy content via the WordPress Importer is the fastest way to import pages, file attachments, posts, and menu items for a new site. It lets you use a top-to-bottom approach ensuring you utilize entire your theme’s features and functionality.
If you’re unknown with how a new theme works or you’re a developer creating a new theme, dummy content can save you a plenty of time. By having the menu items installed and page structures in place you can rename pages, rewrite content and add your own images.
Dummy content could be the ideal helping hand you require to get you started if you’re struggling to bring your new idea to life. That’s all on our behalf and we hope that you thoroughly read this blog.
Thanks for visiting us. If you still have any confusion related to adding Dummy Content to a WordPress Website so you can get our expert advice. For the same, our support team is always ready to deliver WordPress Customer service. Just dial our support phone number +1-888-738-0846(Toll-Free) to know how our professionals can help you.
More to Read
Ultimate Guide: What is RSS and How to Use it with WordPress? Best of 2021
Complete Guide: Build React Apps on top of the WordPress REST API
