Do you want to know How To Backup Your WordPress Site To Google Drive? Most of the people understand that backing up a live WordPress site is a compulsory task for any site owner. If you store the backup in a remote location it obtained from anywhere. It is a sound strategy with a Gmail account it has the cheap and simple solution. In this article, we will show you different ways to backup your WordPress site to google drive?
In case of any help related to WordPress Backup and Recovery feel free to contact to our WordPress Backup and Restore team, dial + 1 844 897 0441(Toll-Free).
Steps to Backup Your WordPress Site to Google Drive:-
Step 1- Install UpdraftPlus Plugin
There are several most important plugin to connect WordPress to your Google Drive account. About a million active installs UpdraftPlus. The most popular and it’s the one I like the most because Google Drive is included in the free edition.
Firstly you can find the UpdraftPlus plugin in the WordPress plugin repository or you can also search for UpdraftPlus in the Plugins > Add New screen.
Read Also: 5 Best WordPress Backup Plugins 2018
Step 2- Configure Backup Contents And Schedule
Next, go to Settings > UpdraftPlus Backups and set up your appropriate options for what is backed up on your site and the backup schedule.
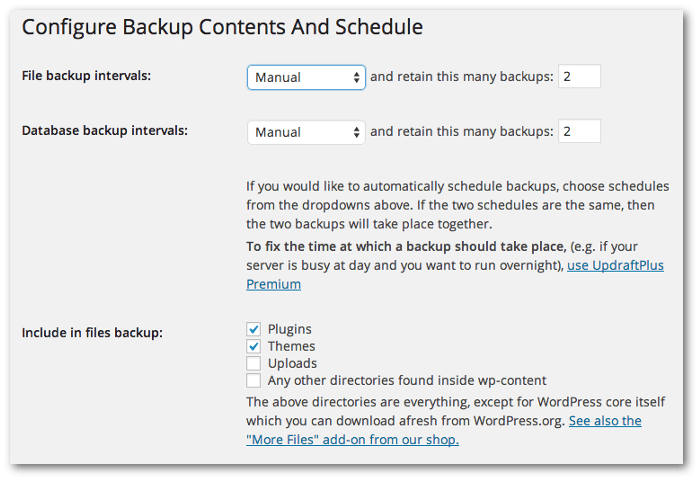
If you post multiple times in a day, is to be sufficient (if you make a substantial update to the site you can run a manual backups). The number of backup, it will depend on restoring to the latest backup or if you want the ability to roll-back to a particular day.
Certainly, you have the option to run different schedules for files and database and this is worth considering. If you change the content of the files, that most files will be copies of files that you have stored locally or can easily re-download, so you may not need to backup as regularly as the database which is going to be an unique store. Start with backing up files weekly and database daily.
Read More: How to Restore WordPress Site with a Database Backup
Step 3- To Configuring Google Drive As The Remote Storage
If you create a google projects based on Drive API and also set up remote access to the Project. In this project, you have to authorize the UpdraftPlus plugins to use. If you want to use Google Drive then select Google Drive from the remote storage. This content will automatically update and give you guidance on how to complete the configuration, along with the all-important redirect URl. If this not work then just copy the URl and head over to your Google API Console (you’ve got a console if you have a Google account).
Create A Project
- In the console window, click on Create Project. Firstly create a new Google Project
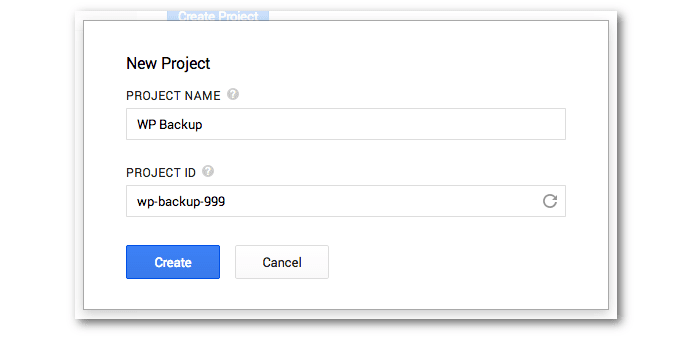
- You can Enter a Project Name and Project ID that makes sense to you and click on Create button.
- Next, you see an Activity window in the bottom right-hand corner of your browser window will open displaying the progress of your project creation task. When the task is completed. You can take a new project in Project Dashboard.
Enabling The Google Drive API
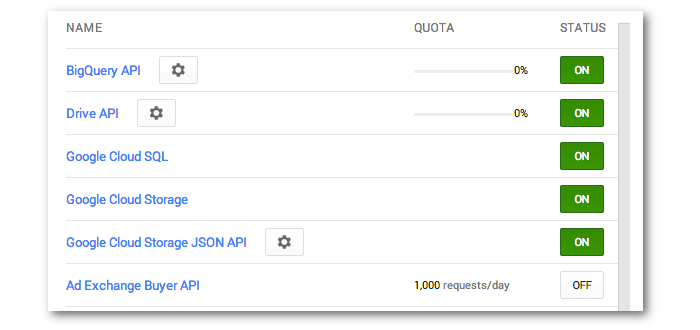
- Click on Enable an API if you need to enable access to the Google Drive API for this project.
- Presented with a list of the huge range of obtainable Google APIs. Then scroll down to Drive API and click on OFF button.
- When the API has been enabled available a message will be appear and Drive API will be listed at the top of the API list along with a number of other APIs that are significantly enabled when you created the project.
- Then Add the Drive API to your Google Project.
Allowing UpdraftPlus To Use The Drive API
- Now you will set up a Project that give access to your Google Drive via an API. Then you need to enable UpdraftPlus to use that Project.
- Next, Go to your project’s API & author menu and click on Consent.
- In this form setting up the look of permission confirmation that is displayed later in the process. For example confirmation next to the form and if you’ve ever used a social network identity to log into another site then you’ll already be familiar with the layout.
- You can select an email address and fill in a PRODUCT NAME to set up consent.
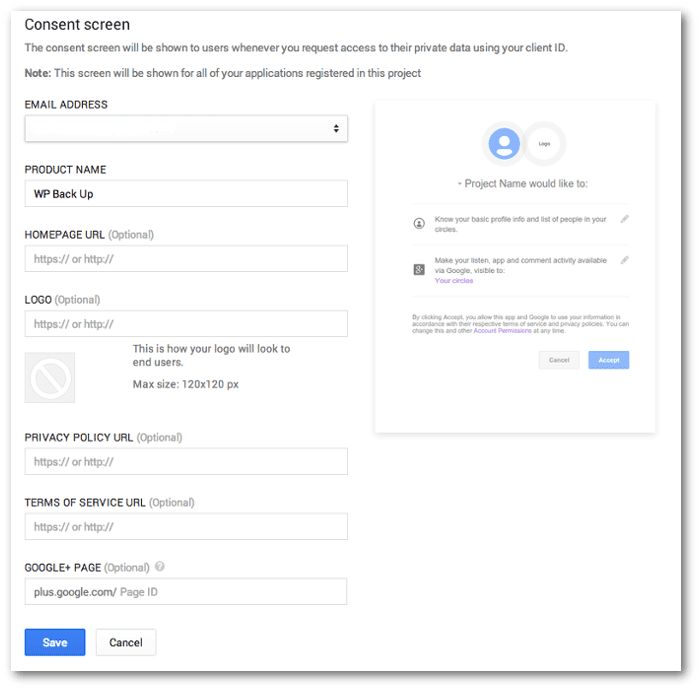
- The form looks like complicated. Then select an EMAIL ADDRESS (if it’s not already pre-selected) and fill in a PRODUCT NAME – I’ve used WP BackUp – and click on Save button.
Set up Credentials
- click on Credentials and under OAuth, click on Create new Client ID.
- Now, create the access credentials for users of the project
- In the pop-up dialog box you can select the selection as Web application then enter your site’s domain name in AUTHORIZED JAVASCRIPT ORIGINS and that URI you copied earlier into AUTHORIZED REDIRECT URI.
- Then, Click on Create Client ID.
- The dialog box will close. New table titled Client ID for the web application.
- Then Copy the CLIENT ID and the CLIENT SECRET from the Console to the Google Drive Client ID and
- Google Drive Client Secret, consequently, in the UpdraftPlus Settings.
- Then, Click on Save Changes at the bottom of the UpdraftPlus Settings screen.
- It will take you back to the Current Status tab, then click on the Settings tab. Click on the link in the notification at the top of the page or scroll down to Authenticate with Google and click on the linked text there.
- In this, you get the following page (notice the product name – WP Back Up– that we set up in Consent) – you can click on Accept to allow access to your Google Drive.
- Request is indefinite but it’s asking consent for UpdraftPlus to access your Google Drive project.
- If you Return to the UpdraftPlus settings. Then you will saw a notification about your Google Drive account.
A humble message for getting through a fiddly process You have configured Google Drive as a remote store for your backups.
Step 4- Test With A Manual Backup
A head popping any champagne corks, though, you need to test the backup process.
- Click Backup Now, On the Current Status tab of the Updraft Settings.
- You see a popup dialog box will appear it allowing you to do some basic configuration of what is backed up but let’s leave the options unchecked and give UpdraftPlus a thorough workout.
- Then Click on Backup Now and watch as UpdraftPlus updates you on the backup’s progress.
- It doesn’t exactly inspire conviction when it will finished, and tell you that ‘the backup apparently succeeded. Check that the backups have actually been created.
- Then click on the Existing Backups tab.
- Not put off by the (0) in the title, it will change almost instantly. You should see an entry in the Existing Backups list. Certainly, the real measure of success is the existence of your backup files on your Google Drive account.
- You can check the contain file when you double click on the folder. All the files will depend on what you selected to be backed up but basically, UpdraftPlus will create separate files for the database, the plugins folder and the theme folder.
Restoring A Backup With UpdraftPlus
As I remark, a backup solution is actually only as good as its restore and it’s probably a good idea to practice restoring rather than trying to break your duck under the pressure of a real disaster framework.
A Part of rehearse is developing a run sheet – a list of the steps that you need to undertake to restore. The most important to note, then, that UpdraftPlus does not back up your core WordPress files taking the approach.
You can easy download these from the WordPress.org archives. It seems a attractive sensible approach to focus only what is likely to be unique on a WordPress installation.
If you recovery the situation, you are likely to be looking at:
1. Firstly Downloading and running the installation process for the appropriate version of WordPress
2. Then Install and redesign the UpdraftPlus plugin
3. Then you can Restoring the themes, database, plugins, themes uploads (if backed-up) folders.
Worth The Time And Effort
There is almost no scenario where backing up is not worthwhile. Most of the Host failures, security failures, Disk failures, can all leave you up that famous creek and if you don’t have a backup of your site to fall back on then you are definitely paddle-less.
When you position up UpdraftPlus to backup to Google Drive it can be a little fiddly, basically, if you want to create a Google Project before, yet it’s well worth the resolve to have those backups stored remotely.
We hope that this article helped you learn how to Backup Your WordPress Site To Google Drive. You can easily restore the backup by following the above steps carefully.
In case of any help talk to our WordPress Technical Support Team, just dial our Toll-Free number + 1 844 897 0441.
