In this era of online business, email marketing is becoming quickly towards many of businesses. Generally, email marketing is used to promote products and services. But the actual definition is – It is used to grow the relationships between the business owner and potential customers (clients).
More so it is an internet marketing segment that encloses online marketing through social media marketing, websites, blogs, etc. However, it is the same as the direct mail. Further, messages are sent electronically through email instead of sending through postal service.
In this article, we will explain to you what is constant contact and how we can connect constant contact to WordPress website.
Why building an email list is so important?
Are you know that every website on the internet wants to have your email address? Whether you’re creating an account on Facebook, Twitter, or the New York Times, etc. they all want your email address.
The answer is simple – Email is a good way to reach your customers. A recent study found that small businesses get $40 back for every dollar that is spent on email marketing. This is an effective way of converting visitors into customers.
Let’s see how to create an email list with Constant Contact for your WordPress site.
Constant Contact definition – Its benefits & features
Constant contact is the most popular email marketing service providers all over the world. They are experts in sending the mass email to your customers, managing your email lists, and running effective email marketing campaigns.
It can be quite heavy to start their own email list for small businesses. Constant Contact ensures that the beginners can run their email campaigns like a pro.
This is a premium service with a 2-month free trial. After that, pricing starts as low as $20/month.
Benefits of Constant Contact
- Easy to Use.
- The account is easily accessible.
- Best Email Marketing Toolkit.
- Get support from real people.
- Best event management tools.
- Choose hundreds of templates.
- Cheap email marketing that Works.
- Save Capital, Save Time, Less Effort.
- You can upload contacts through various methods.
Features of Constant Contact
- User-friendly Drag and Drop Design.
- High-powered Tools for List Building.
- Contact Management Tools.
- Social Media Integration.
- File Storage and Images.
- Track and Analyze.
- 24/7 Support.
How to set up Constant Contact?

To set up Constant Contact, First thing you need to go to the Constant Contact site and then sign up for an account.
After that, you will reach on the Constant Contact dashboard.
Here, you’ll see three simple steps that help you to set up Constant Contact.
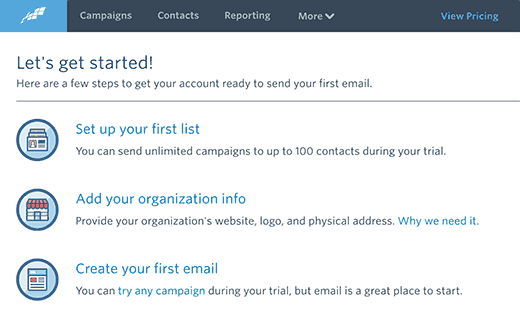
Step 1: Setting up your first email list
First, you have to click the ‘Set up your first list’ link, it will bring a popup where you will require to provide a name for your email list and some email addresses to add into it.
After this, click the Save list button to continue.
Step 2: Add your organization info
All outgoing marketing emails for the CAN-SPAM act require a valid postal address. Constant Contact makes it very easy for you to follow this law by providing information about your organization. Constant Contact will automatically add this information to the footer of your email.
You have to click the ‘Add your organization information’ link, it will take you to the form where you require to provide your business information.
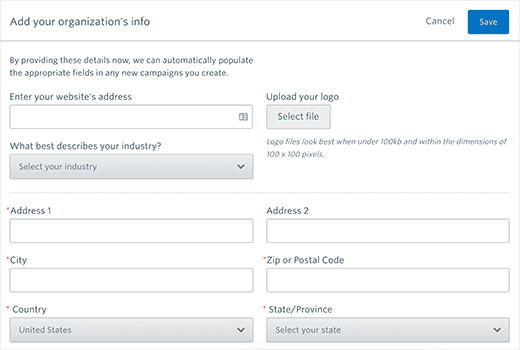
Now, you must provide your website address and postal address. You will be asked to choose an industry for your business and upload an image logo.
Don’t forget to click the save button to save your settings and continue to the next step.
Step 3: Send your first email
Finally, you have to click the ‘Send your first email’ link. Although the Constant Contact will show you a lot of awesome email templates that you can easily choose from.
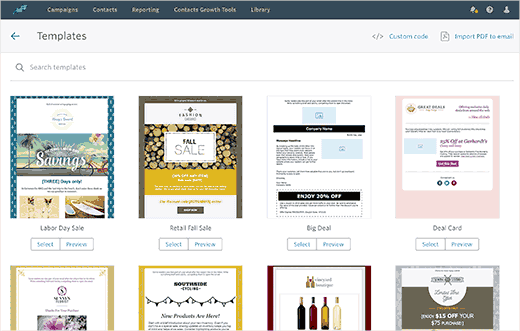
However, this will open the templates in Constant Contact’s live WYSIWYG email composer. This drag and drop design tool permits you to easily design your email.
First, you have to provide a title for your campaign. Next, you can change the images used in your own template, add your own text and branding.
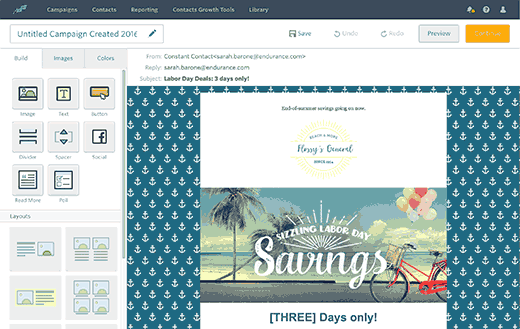
When you are satisfied with the result, then click on the release button.
You will now access the Email Options page. This is where you need to choose which email list to use when sending emails or change the sender’s name and reply-to email address.
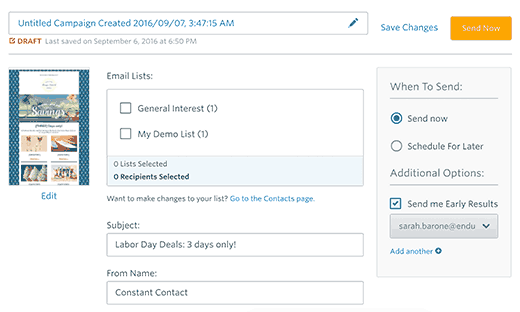
Once you are finished, click the Send Now or Schedule button now to continue. Now you have successfully completed setting up your contacts contact account.
Next thing is – how we can add it to WordPress site: Have a look?
Adding Constant Contact signup forms in WordPress
Now that you have established your Constant Contact account, then the next step is to collect email addresses by asking users to join their email list.
There are several ways to do this: You can copy and paste the signup form code from your Constant Contact account to your WordPress website.
Also, you can use the plugins such as OptinMonster, WPForms to add highly customized signup form in your site. These will help you get many more email subscribers faster.
Method 1: Adding Default Constant Contact Signup Forms in WordPress
However, to create email signup forms, the Constant Contact comes with built-in tools. Also, you can add these forms to your WordPress site.
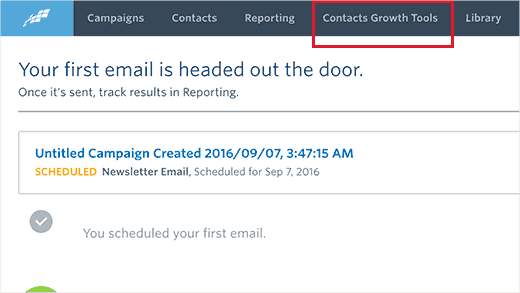
The first thing you have to log in to your Contact Contact account. And after that click the ‘Contacts Growth Tools’ from the navigation menu at the top.
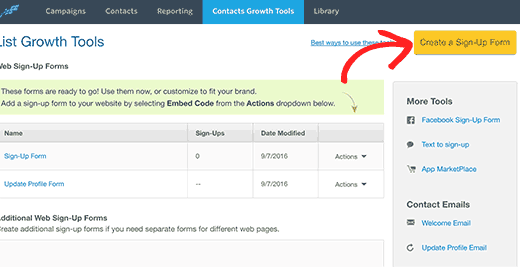
On the next page, you will have to click the create a signup form button.
It will bring you to the Form Builder Wizard.
First, you have to provide the name of the form. This name will be used internally. So that you can identify a form in the Constant Contact dashboard.
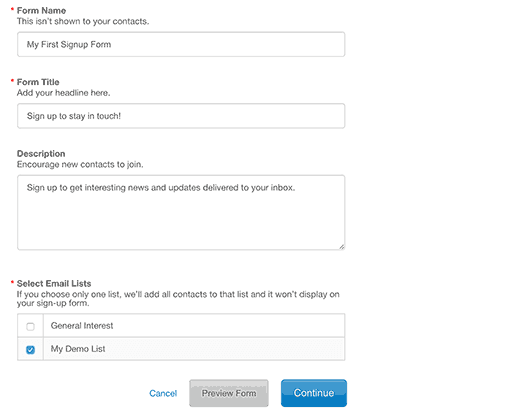
After this, you have to provide a title and tagline for your form. Both of them will be appearing in your form.
Finally, you have to choose at least one email list. Users signup using this form will be added to these lists.
Click the continue button for the next step.
Now you will need to add fields that you want to display on your signup form. Email address field is required. You can click the ‘Additional fields’ to add more fields to your signup form.
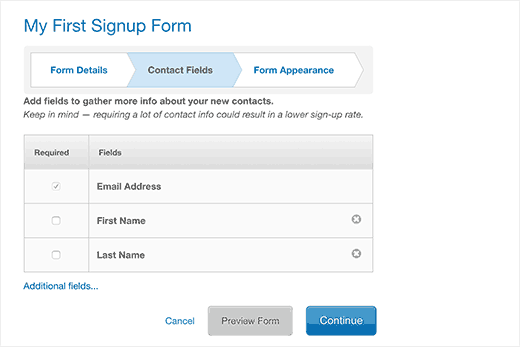
After adding the form field, click the Continue button.
In the last step, you can select your font color, background color, and add a logo.
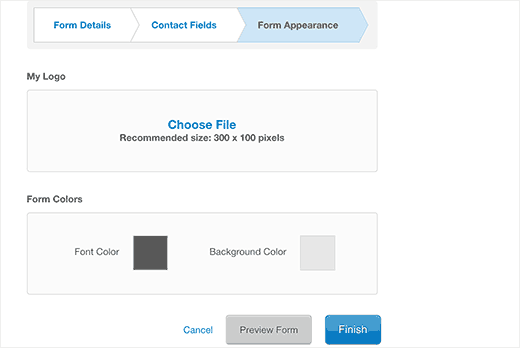
By clicking on the preview button, you can see how your form looks. Once you are satisfied, click the ‘Finnish’ button.
You will be redirected back to the contacts growth tools page. You will see the form that you created under the ‘Additional Web Sign-Up Forms’ section.
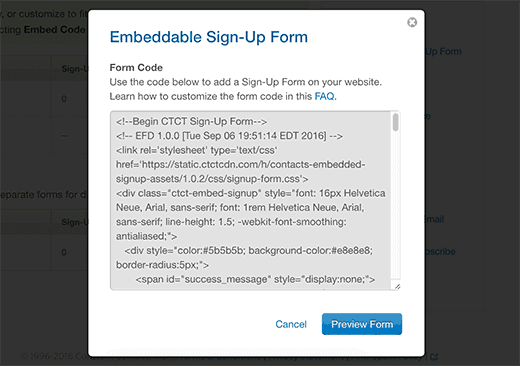
Now you require clicking the action drop-down menu. And after that select ‘Embed Code’.
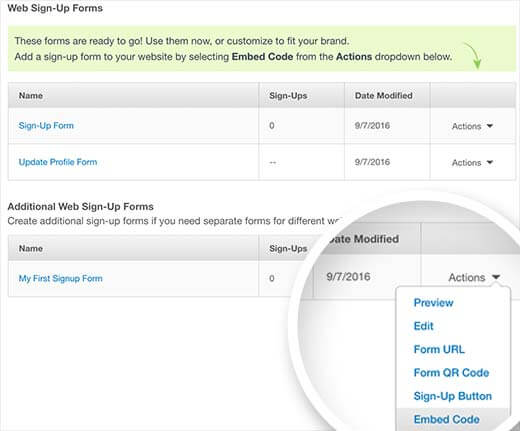
It will bring up a popup anywhere with the embed code to add your form. You will need to copy this code and paste it into a text editor like Notepad.
Now go to your WordPress Admin Area and click the Appearance>>Widgets.
Drag and drop the text widget to a sidebar from the list of available widgets, where you want to display your signup form.
Paste the code that you copied from the Constant Contact website in the text area of the widget. Once you are finished, then click the Save button to save your widget settings.
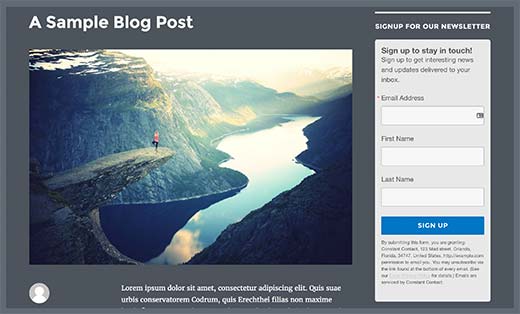
Now, you can go to your site to see the signup form in action.
Method 2: Add Constant Contact Signup Forms with OptinMonster
While basic forms are easy to embed, they are not ideal for high conversion.
The average users who visit your website spend a little bit of time viewing at non-content element. You need email signup forms which grabs the attention of your users.
This is where the OptinMonster comes in. This is the most popular lead generation tool in the market.
Also, you can create beautiful sign-up forms that are optimized for conversion and do A/B tests without recruiting the developer.
OptinMonster comes with a variety of signup forms like exit-intent popups, floating bar, sidebar forms, slide-In forms, after Post Form, welcome Gate, full Screen and much more.
Also, you get powerful features like MonsterLinks (2-Step Options), Scroll detection, A/B testing, page-level targeting and more.
Although the OptinMonster works well with all popular email service providers including Constant Contact and WordPress.
Method 3: Embed Constant Contact signup form with WPForms
The very first thing, you need to install WPForms plugin and then activate it. Thereafter, create an account.
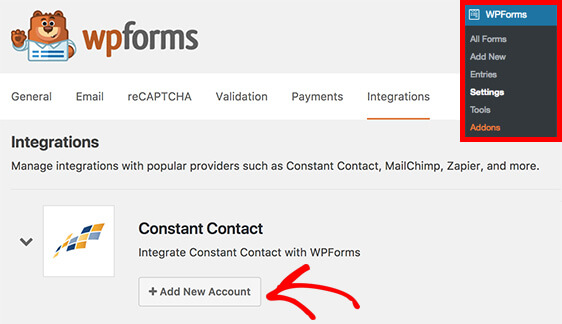
Once you have been created an account successfully, then open your WordPress admin area and go to WPForms » Settings to start the configuration.
Here, in the setting page, click on the integration tab, inside it, press the constant contact section to open it. Now press the Add New Account button.
Here register WPForms with constant contact by clicking the register with constant contact button. See screenshot below:
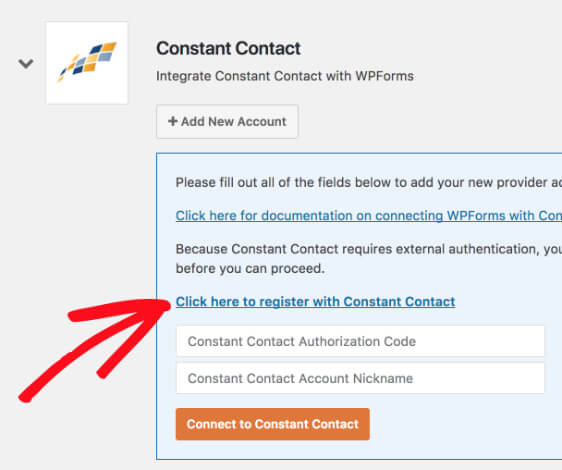
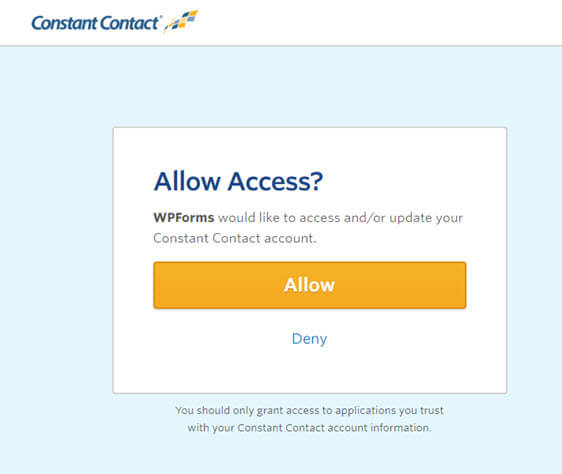
Now, you will see an overlay for you to log into your Constant Contact account. Once you logged in, click the Allow button to allow access for WPForms.
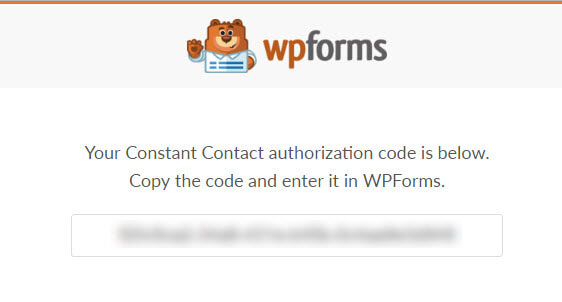
Here you will appear an authorization code, you have to copy this code into the Constant Contact Authorization Code field back in the WPForm’s settings page.
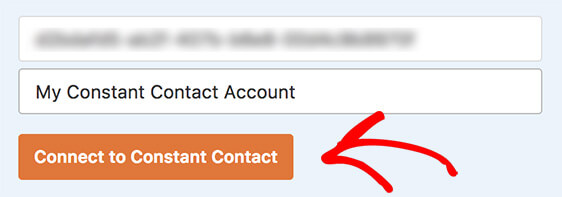
You can use any name in the Constant Contact Account Nickname field just for your internal reference. After filling up both fields, press the connect to the constant contact button to continue.
When the WPForms connect to your site, you will appear a green connected button that indicates your site has been connected successfully.

Connect your form to constant contact
Now you successfully connected to your site, but the question is how we can connect the constant contact to form:
To create your constant contact newsletter subscription form, you can add a new form or edit an existing form.
Here we will create a new form via the Newsletter Signup Form template.

Thereafter, connect the form to a constant contact account. Here go to the Marketing>>Constant Contact in the form builder and choose the Add New Connection.
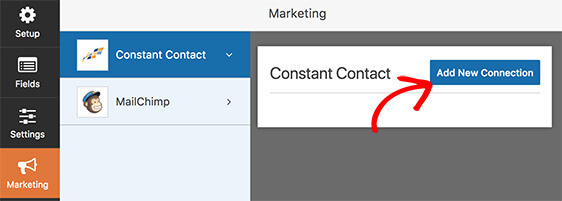
You will see an overlay, now you can enter a nickname for the connection that you have creating. It’s very useful in case when a plan to connect this form to more than one mailing list. Note that your users will never see it.
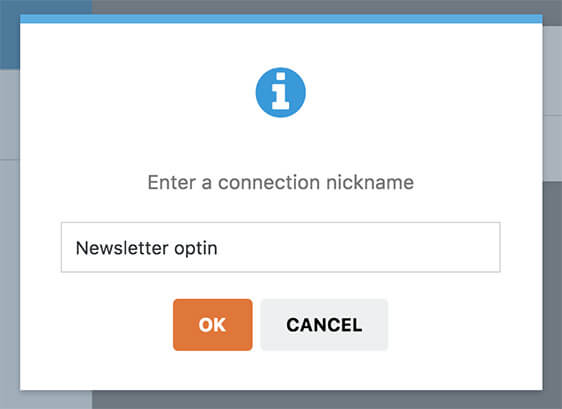
Once your connection is successfully created, you can select from any constant contact account that you have connected in the first step.
After this process, you can also select a specific mailing list within that account.
Note: It is necessary that all the mailing lists must be created in your constant contact account.
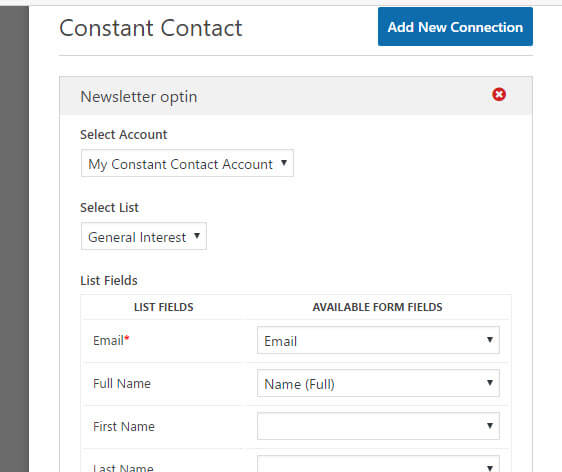
Now you will see all the available fields under the list field section for subscriber information to be added to your constant contact mailing lists. Here only you need to fill Email Address in this field.
Connecting Additional Fields
You will need to map your form fields to the relevant fields for sending the entry fields to constant contact. Constant contact offers you some fields for your subscribers such as:
- Full Name
- First Name
- Last Name
- Phone
- Address
- Website
- Job Title
- Company
Once you have done configuring the form settings, click the save button to continue.
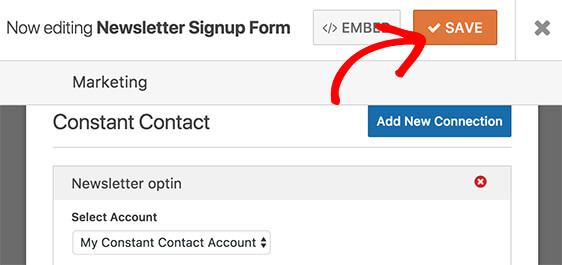
That’s All! Now you have successfully created a newsletter signup form.
Send WordPress posts to your Constant Contact email list
However, Constant Contact makes it very easy to add your WordPress content to your email campaigns.
Note: Constant Contact does not currently offer to send blog posts automatically to the email list.
First, log in to your Constant Contact account and go to the Campaign page. You have to click the create button and then choose to send a new email.
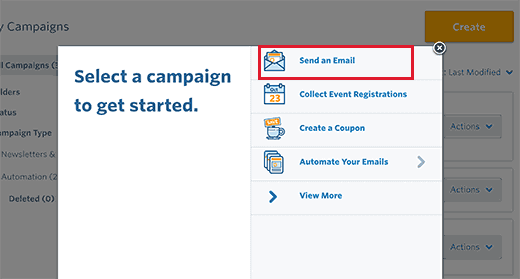
Also, you will be asked to choose a template for your email. After that, you will reach the Email Builder screen.
Furthermore, drag and drop the “Read more” block from the left panel into your email preview. After this, click the read more blocks in the email preview to edit it.
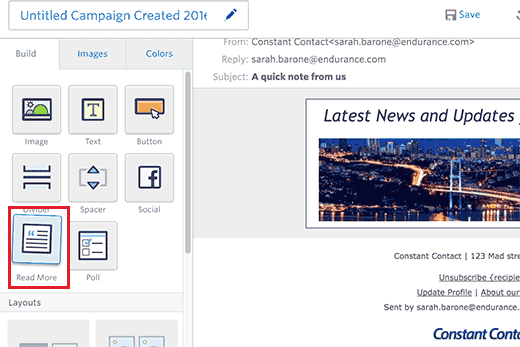
It will bring up a popup window. You must provide the URL of your WordPress blog post and then click the preview button.
However, Constant contact will automatically fetch an image from your article and an article summary. And now you can click the Insert button to add it to your email.
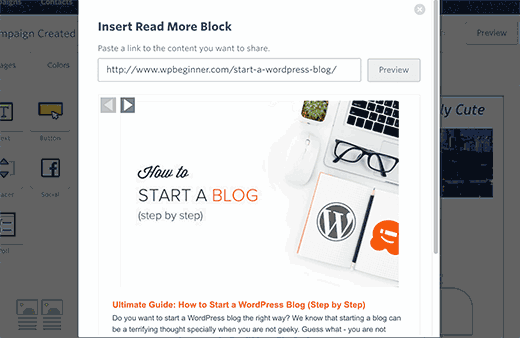
Repeat the same process to add more content from your WordPress blog to your email. Once you finish, then go ahead and click the continue button.
Then you will reach the last step of creating your email. This is where you can choose whether you want to send an email immediately or schedule it.
Bottomline
Now, the Constant Contacts will send your emails with your blog content to your subscriber. It is a very useful practice to run your business smoothly with the constant flow of your email contact lists and manage it efficiently.
We hope this blog is helpful for you. Still, if you have any problem, you can contact our WordPress Support Team. Dial our WordPress help number +1-888-738-0846 (Toll-Free). Our WordPress customer service is always for you.
That’s all, thanks!
Read More Blogs:
