WordPress Content restriction is a term that starts with the idea of assigning the content to a particular set of users. Restrict Content Pro Plugin can be used for this. Now we will show you how to restrict content to registered users in WordPress. Here we will be using Restrict Content Pro plugin.
As, a plugin is defined as a type of software that contains a group of functions that can be added to a WordPress website. They are used to provide additional functionality to your application.
If you don’t want to purchase the pro version or want to try out the plugin before buying, then you can simply download the Restrict Content Pro free version which has limited support and features.
Why use Restrict Content Pro?
Restrict Content Pro is a great plugin. It includes many features and is easy to install. This plugin is easy to manage. The development team takes useful steps to assure that each line of code is upgraded and commented. The plugin is very helpful in WordPress content restriction.
Features of Restrict Content Pro
- It has discount codes for easy marketing and growth.
- Restrict Content Pro is very simple to install, setup and use.
- Easier integration and you can accept payments with multiple gateways such as PayPal, Braintree, 2Checkout etc.
- The codes behind the plugin are clean.
- You can create unlimited subscription packages with multiple levels.
- Generate Analytics Reports for great understanding of visitors involvement.
- Allows you to easily create login, signup, user account pages.
From the above mentioned features it is clear that this plugin is very powerful and capable of converting your WordPress website into membership enabled content center with proper restriction.
Starting Out With Setting Up Of Restrict Content Pro In WordPress
The first thing you need to do, is to download the plugin. After downloading install and activate it. Upon activation a label of Restrict Content Pro will be joined into your WordPress admin sidebar. Click on the Restrict Content Pro label and get started with more controls and settings.
Here, sidebar is a theme feature, which is basically a vertical column provided by a theme for displaying information other than the main content of the web page.
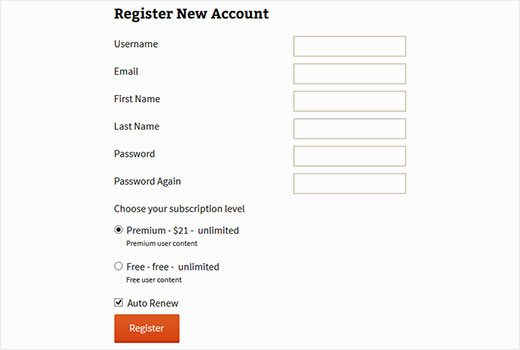
For proper utilization of the plugin, let’s start with creating a sign in, register, and manage subscriptions pages in WordPress. Page creation is very simple. All you need to do is go to Pages>Add New to create a new WordPress page and then use proper shortcode available within the plugin.
Where, shortcodes are those special functions/tags that allows the user to quickly and easily pull related bits of mentioned functionality into their content. Shortcodes can contain files or also they can create objects that would require lots of complex ugly code only in one line.
- Use [login_form] shortcode in the login page.
- Use [register_from] shortcode in the register page.
- Use [subscription_details] shortcode in the subscription page.
The registration page is redirected to the subscription page. At whatever time the user selects a subscription page, it will be redirected to the registration page. After creating the required pages, set up Restrict Content Pro settings.
Configuring The Restrict Content Pro Plugin
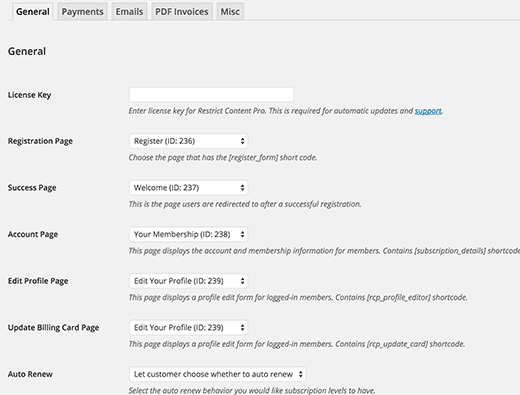
Go to Restrict >Settings and you will land on the settings page which contains different fields that can be used to make the plugin work according to your requirement. If you have purchased the plugin, just enter the license key which is for plugin updates and support.
Next, select your registration, success, account management, and billing update pages.
Just click on the payments button for configuring your payment gateway. For selecting the right payment gateways, you need to add currency type and add payment gateways that you want to use on your website. Low sandbox model enables you to check out quickly gateway payment workings.
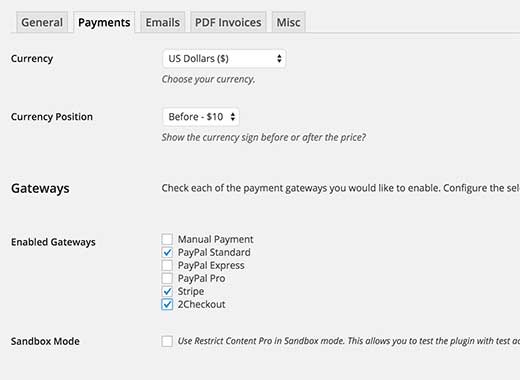
For every payment setup, you need to use various ways. You need to maintain your PayPal email address for PayPal Standard. API keys are vital if you are using PayPal Pro or Express.
The emails tab present on the settings page allows you to modify the emails sent out by the plugin. If you are having trouble receiving emails, then check out our guide on Quick Fix: WordPress Not Sending Email Issue
Configure the misc settings. There are some necessary options available under the Misc tab on settings page. Here you can setup login page redirects, disable account sharing and setup reCAPTCHA for registration form for preventing spam registrations.
Creating subscription levels
Next create Subscription levels for your restricted content. It allows you to create various level of subscriptions for your content. Creating a subscription level in Restrict Content Pro is quite easy.
Insert all the important fields like Name, Description, Access level, duration, price, sign up fee and status. To create a subscription level for registered non-paying users you can set the price to 0.
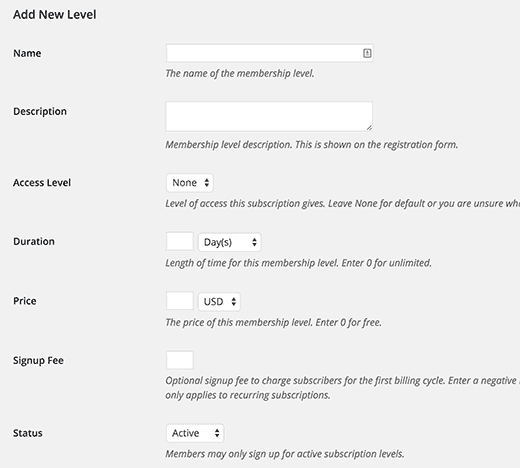
From here choose the duration of a subscription level or set it to 0 to make the duration unlimited. Next set the status to Active.
Also Read: 7 Important Tips to Secure the Login Page in WordPress
Restricting WordPress Content
After completing up with the setup procedure, you can now restrict each article according to subscription levels. It enables you to restrict content on a post by post basis. Where, articles posted by the admin of a WordPress site are called posts.
At the bottom of each new post, custom post type you will see a restrict this content box with options to control who can see that precise post.
As apost type is a collection of rules that are used to explain the way of content. Each & every post has its own parameters which define a particular post so that you can understand properly the difference between post, page, archive, revision or a navigation menu.
Navigation menu is an important part of any WordPress site. It is a WordPress theme feature that was introduced in version 3.0. It allows you to create navigation menu by using WordPress Menu Editor in the WordPress admin panel under Appearance>>Menus.
The admin panel is also known as the administration area in WordPress website where only an authenticated user can make changes. Generally, to access it, visit wp-admin directory in your web browser.
Here, a WordPress theme is a group of stylesheets and templates that are used to describe the appearance and display of a WordPress site. A WordPress theme changes the layout & design of your site.
Templates are those files which control how your WordPress site will be displayed on the Web. These files draw information from your WordPress MySQL database and generate the HTML code which is then sent to the web browser.
Here, MySQL in WordPress is a central component in the LAMP stack of open source web application software which is used to create websites
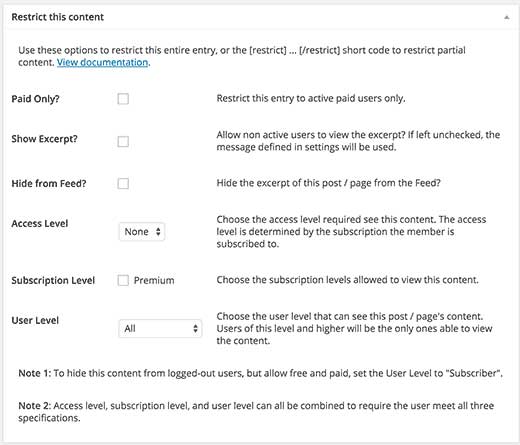
From this window you can choose access level and subscription level for the content. You can select to restrict content based on user’s role, access, or subscription level. Content hiding is viable within a post using the shortcode like:
[restrict] Your restricted content goes here… [/restrict]
Managing Membership And Adding Discount Coupons
1. Managing membership
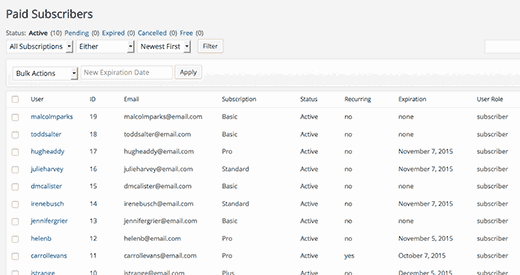
For managing membership in Restrict Content Pro go to Restrict>Members. Click on each member to view their membership details, payments received, and the status of their account. One can also deactivate a member’s subscription at any time.
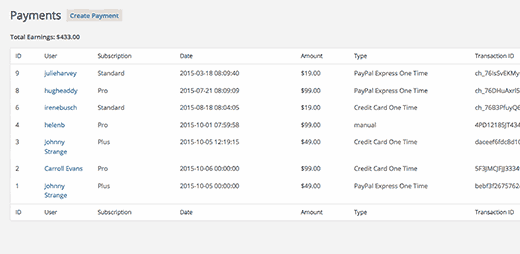
Payment can be managed by going to Restrict > Payments. This will show you the payments you have received. This window contains the user name, their subscription plan, amount and date with each payment they make.
2. Adding Discount coupon
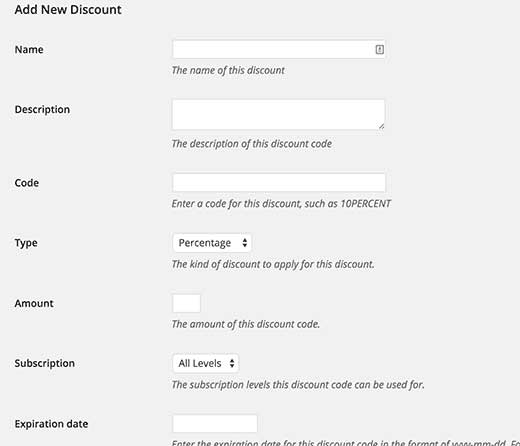
Discount Coupons can help you enhance your subscription rate and allow visitors to take advantage of your content. People love the discount, as it allows you to take care of the user needs. Just fill the form for adding discount.
Conclusion
Restricting WordPress content according to subscription is a great strategy for distributing your content. All websites having excellent content should always monitor their content according to the subscription level.
We hope that this article helped you restrict content to registered users using Restrict Content Pro. If still you are facing problem our expert panel is there to help you , just contact our WordPress Technical Support Team, Dial +1-888-738-0846 (Toll-Free).
