
Are you willing to know How to install WordPress WooCommerce theme? Before this installation, you must know about WooCommerce. It is the most popular and open-source e-commerce platform for building your online business. It is a free e-commerce plugin and you can download it very easily. But what you actually see is the power when you start using its Plugin and Theme from the beginning.
Do you really wish to use a WooCommerce theme? While it is not necessary, I highly recommend that.
hence, not only the themes of eCommerce-centric by design but also the total number of themes is centred around its style.
Read Also: How to simply install WordPress WooCommerce Plugin
Before You Add A WooCommerce Theme In WordPress
Well if want to start your own eShop or building it for your business company. Then firs of all, you must need to make sure that you have got all the things prepared. Because there a few importent things that need to take care before you start the process to install a WooCommerce theme in WordPress.
These things are as follows:
Must Install WordPress
This is the very first thing to make sure that you have installed the latest version of WordPress. Therefore if you do not have it yet on your desktop. Then you must install it and update your WordPress to the currentely latest working version.
Backup Your Importent Data
Well, if there is some data which generated before then you mush have to secure it. Because, if you have set up your own website before and some important data remained there. Then it is highly recommended to backup or export that data first before you install the theme.
It is importent because when you will activate a new eCommerce theme in WordPress. Then the appearance of your website will be changed accordingly. Sometimes, it is going to affect the functions of the previous theme.
Choose Your Desired Theme
Well, an appropriate WooCommerce theme for your WordPress is really very important. Therefore you must choose a top-notch and well equpped WP eCommerce theme,which is compatible with the latest version of WordPress.
In addition, it is better that you must select a WooCommerce theme that work according to the current business trend. Thus it will help you to increase the traffic and even more sales. Hence we suggest you to get any one of the best free WooCommerce themes for WordPress.
Well, after setting up all that, now it is time to install the WooCommerce theme in WordPress for your website.
Steps To Install WooCommerce Theme In WordPress
Well, All you have to do just follow the given below step by step procedure to get install the WooCommerce theme in WordPress very easily.
Steps to install the WooCommerce theme in WordPress are as follows:
Step 1: Install Dummy Data
The dummy data is with your WooCommerce plugin. It helps to add fictional products to your storefront to visualize your store with products.
After completing this installation and set up your WooCommerce theme. Consequently, you will need to delete all the dummy data before adding your products. Otherwise, you risk accidentally deleting your own product data.
Well, if you have added the products to your WooCommerce website already. Therefore we would suggest you that leave this step. Because it is no longer needed and continues the process with the next step 2.
In addition, if you already have installed the WooCommerce within the WordPress Admin. Then you should go ahead and download the required plugin from the Plugin Directory of WordPress to your computer.
Because this will be much easier than the other process such as first logging into your FTP, then going into your plugin directory, and after that, you will be able to download the dummy data from there.
However, once you have complete your download process, then you should unzip the file. After that, you will be ready to import the dummy data from your dummy-data.xml file easily.
Although to import the data you should go to the Tools option and then click on Import. However, do not get confused with the WooCommerce Tax Rates (CSV) file. Because you can do it later whenever you like. In addition, for the WooCommerce Dummy Data, you will have to select WordPress.
Well, now it is very obvious that probably you will not have the WordPress Importer plugin installed, therefore you should go ahead and install this plugin now. When you install it, then go ahead because you must Activate the Plugin and then Run Importer.
Well, if you remember that where you have download and unzipped the WooCommerce plugin. Then you should now need to click and Choose File to make your way to it.
However, the dummy data must be in your unzipped folder location, go to find it: woocommerce.version.number > woocommerce > dummy-data.
Now you have to open the dummy-data folder, and then choose dummy-data.xml. And then you are ready to upload the file and import dummy data.
Although this will be the last thing that you will need to do before you import all the dummy data. However, this is just a personal preference.
You should Import the default author of the Wooteam instead of creating a new author or using a pre-existing author. Therefore in this way, you will easily know what content was imported or created during this process based on the name of the author.
However, we suggest that you should delete the author when you remove the dummy data. Just after you have finished installing and setting up the all-new WordPress WooCommerce theme.
In addition, we also suggest that you should Download and import the attachments. Therefore you will have images that associated with each product. But, you will have to make sure that the media is removed properly when you have finished with the dummy data.
When you have made all these selections and submit them. Then you should visit your website to see the fully imported test store. Maybe it is not designed so well as you want but still, it is good. However, the most important thing is that we are going to install a great looking WordPress WooCommerce theme now.
NOTE: When you have done with installing and setting up your theme. Then you should make sure that you delete the products and images from the dummy data import. Before you start to add your own products.
Step 2: Install a WordPress WooCommerce Theme
If you did not download your theme already, go ahead and download it to your computer, (you know where you are downloading it, so you can access it.)
There are two different ways you can install your theme:
1. From WordPress Admin.
2. Access your website using FTP.
1. From WordPress Admin
Installing the theme from WordPress Admin requires that the theme folder is zipped (themefolder.zip). You know that when you working with the actual theme folder and not the folder your theme may be packaged in.
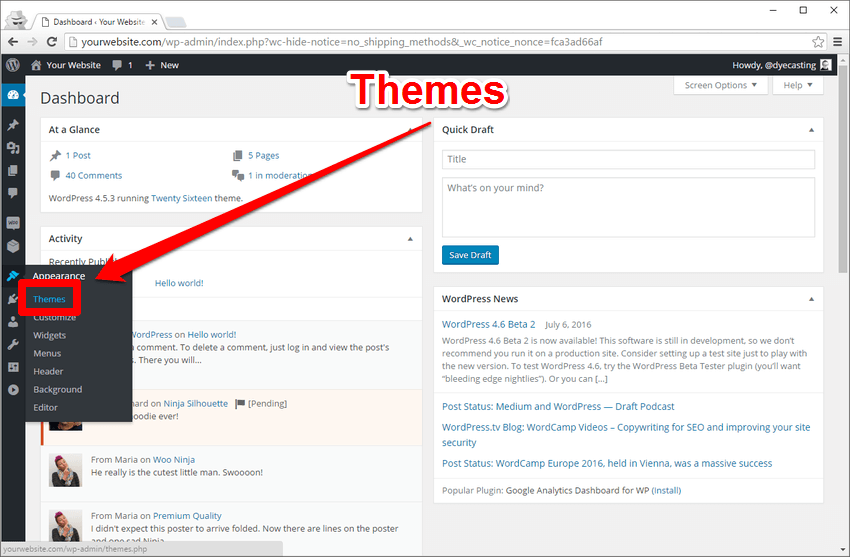
- From WordPress Admin, under appearance, click Themes.
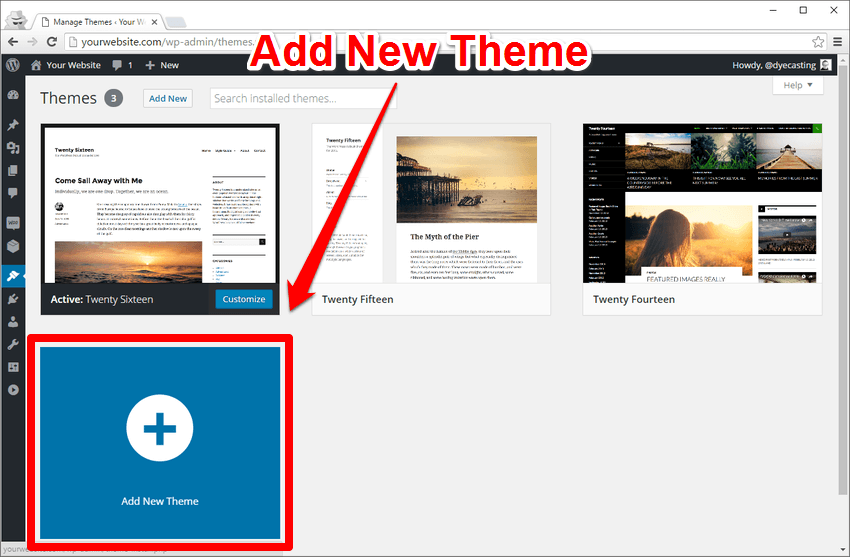
- Add new theme.
- Upload theme at that place where your theme file is located, it is in the zip file like as (savoy.zip).
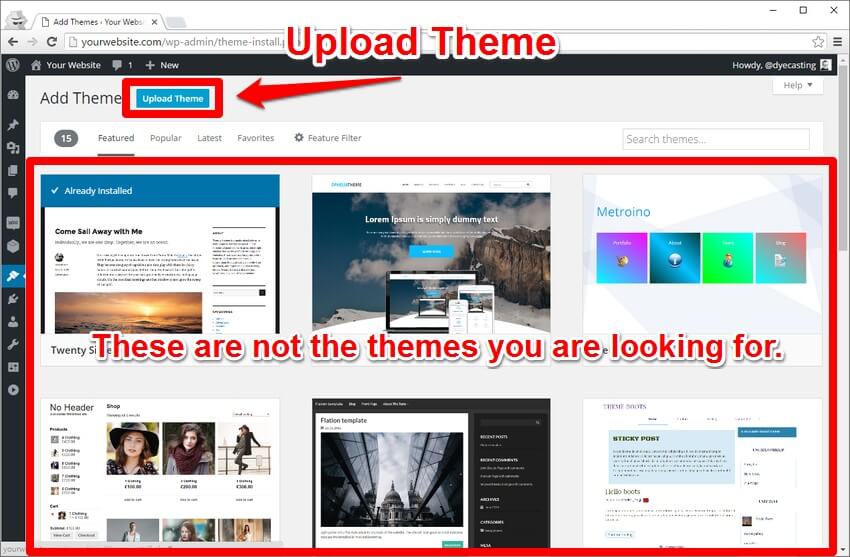
- Click Choose File and make your way to it.
Once your theme is installed, you can visit Appearance > Themes in your WordPress Admin to see
click to activate it straight away.
The Savoy theme has installed successfully, so mouse over and activate.
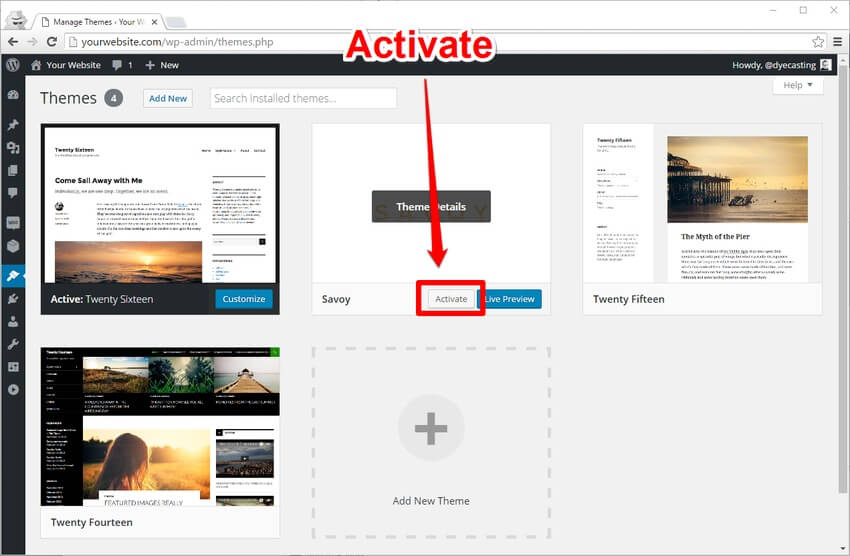
Now your theme is successfully is installed and activate.
2. FTP Your Theme
If you are comfortable using FTP, go ahead and connect to your server and make your way to the wp-content>theme directory, where you will want to send your theme. Before you send your unzipped folder to your server, you know that makes you are sending your theme. After unzipping your download, you will see there are a number of different folders.
Sometimes the zipped folder you download is the real theme folder. It is a better idea to double-check since this varies from place to place.
If you look in the Theme file folder for savory, you will find your theme (savoy.zip).
If you are installing FTP, go forward and upload your unzipped theme folder into theme directory.
Step 3: Set Up a WordPress WooCommerce Theme
This step helps you to get your WordPress WooCommerce theme setup-no matter what theme you are using from ThemeForest or anywhere else:
Recommended/Required plugin
- After installing and activating the Savoy theme you will be notified of recommended plugins.
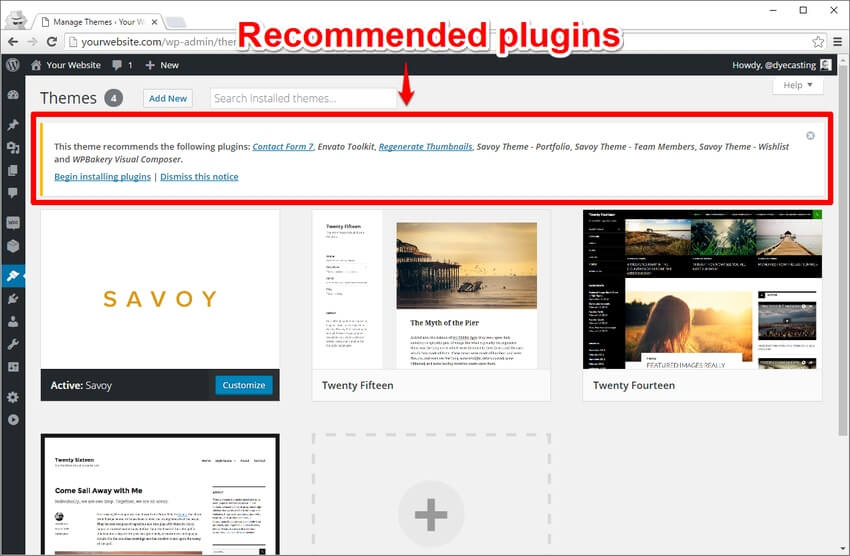
- Sometimes your theme notifies you of recommended plugin while others include the recommendation with our documentation.
- Click on first installing plugins in the theme that you are uploaded to see the list of recommended plugins.
- In this case, you may or may not want to install all of these.
Customize
Customize is the part of installing and setting up your WooCommerce theme when it gets actually fun and you start to see your website come to market.
- You can access the WordPress customizer from the menu: Appearance > Customize.
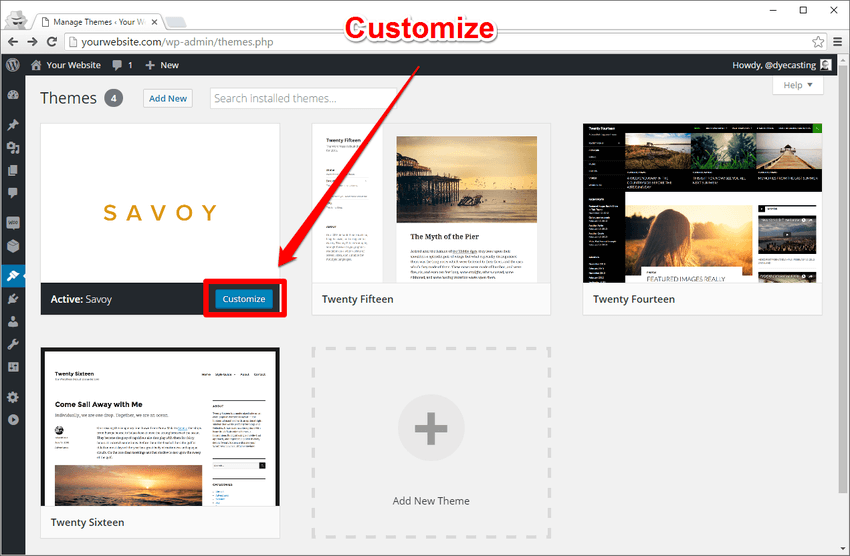
- Otherwise, go to the theme page under Appearance > Theme and then click the customize button.
Welcome to the WordPress Customizer.
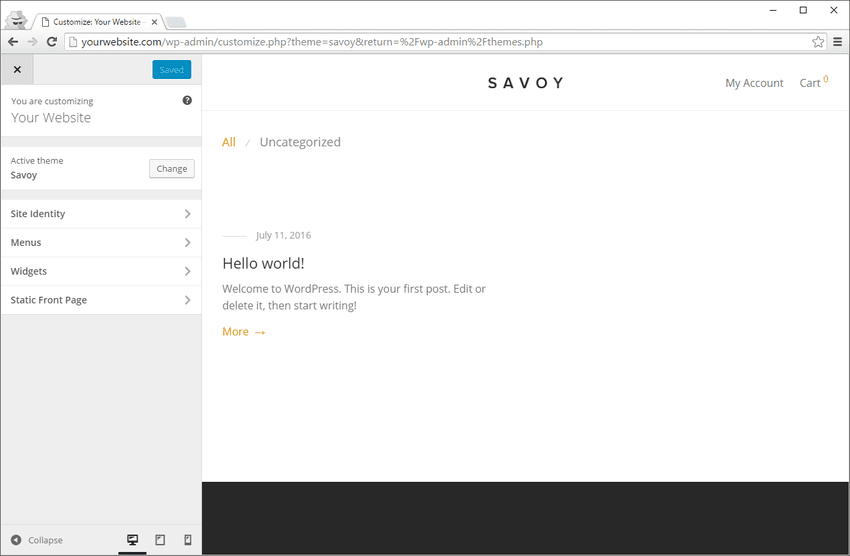
- The first thing after the entry you will see the Site Identity, where you can change your Site Title and Tagline
- Next up, configure your menu.
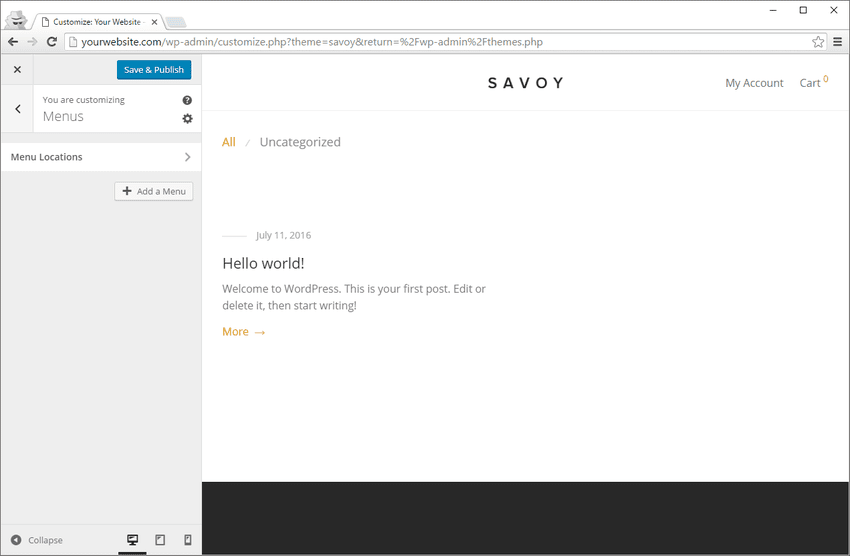
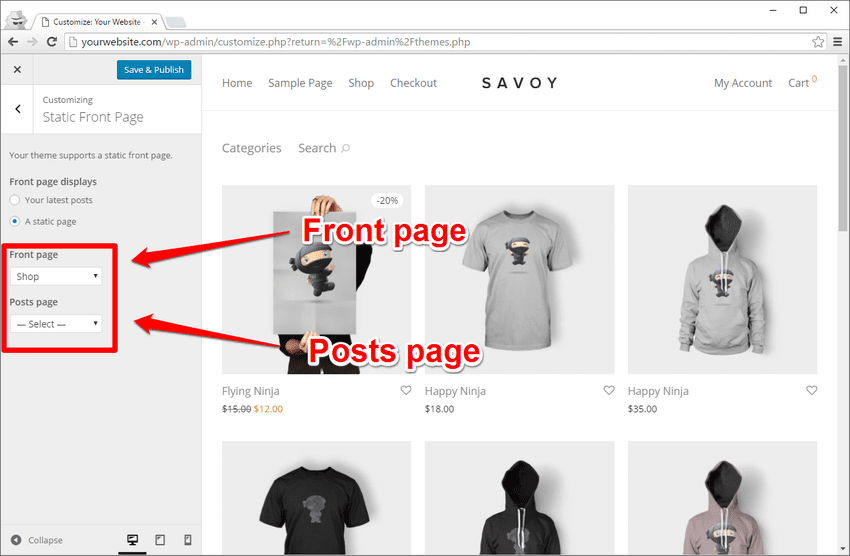
- You can easily add and create a new menu. Before leaving the Customizer, you will want to tell WordPress to make the front page your store.
The Results
- Now, you can see how good your online store can look using a WordPress WooCommerce theme.
- The individual product pages look amazing.
- It even includes related products.
Conclusion
Finally, you can see how easily these steps helps in configuring new WordPress WooCommerce theme and how good it look by using a WordPress theme designed especially for WooCommerce.
Looking at some of the best-selling ThemeForest WooCommerce themes might be a good place to start. You will find these things that fit your eCommerce store perfectly.
We hope that this article helped you in installing WooCommerce Theme in WordPress. Still facing problem regarding to WooCommerce Setup feel free to avail our Support Services, talk to our Experts dial +1-888-738-0846 (Toll-Free).
