Making a website we can choose a host to make it live but choosing the right hosting provider is a very haunting task. You’ll pick a good hosting provider so you don’t need to migrate your WordPress website but if you take the wrong choose hosting platform then, you need to migrate your WordPress site to a new host. The main reason for switching a web hosting or migrating a WordPress site from one server to another is data loss and downtime.
Fortunately, migrating your website to a new web host isn’t a difficult task. So here in this article, we talk about WordPress migration to a new host. Step-by-step explanation and additionally, I’ll introduce you to related information.
- How to migrate a WordPress site to a new host Manually?
- Step 1: Choose a new WordPress host
- Step 2: Backup your Website’s Files
- Step 3: Export WordPress Database
- Step 4: Create a WordPress MySQL database on your new host server
- Step 5: Edit the wp-config.php File
- Step 6: Import Your Database
- Step 7: Upload your WordPress files to your new host
- Step 8: Linking to new URL and defining new domain
- Changing Site URL
- Step 9: Reconfiguration of your wp-confing.php files
- Migrate WordPress site to new hosting using a plugin
- How to add an entry for your domain name in the host file?
- How to move a WordPress site to a new domain?
- Migrating WordPress Site to a new server
- Some other best plugins to migrate a WordPress site to a new host
- Conclusion
How to migrate a WordPress site to a new host Manually?
The following are the steps that will help you to migrate your WordPress site to a new host.
Step 1: Choose a new WordPress host
If you have tired up with a slow web host after optimizing WordPress speed & performance, so don’t worry, migrate your WordPress site to a new server by which you can grow your traffic. A higher rank in search results generates traffic on the site as well as increases the brand’s position and works as a key to business assets.
If you are going to a new WordPress hosting provider so choose it very carefully so that you don’t need to choose again and again.
We recommend some hosting providers which are as shown below:
- For a reliable shared hosting server, we recommend you move to Bluehost. They are officially recommended by WordPress.org.
- If you are looking for cloud hosting or location-identifier providers, then we recommend you to check out Site domain WordPress Support. They have data centers and free support across three (3) different continents of the world.
- If you are looking for a dedicated server, then we recommend you check out the InMotion Hosting server. It commercially provides class servers and its support is amazing.
Once you choose the best provider, it’s necessary to back up your site in order to save your site data.
Step 2: Backup your Website’s Files
[The image to illustrate the same is attached from the source – wpexplorer.com]
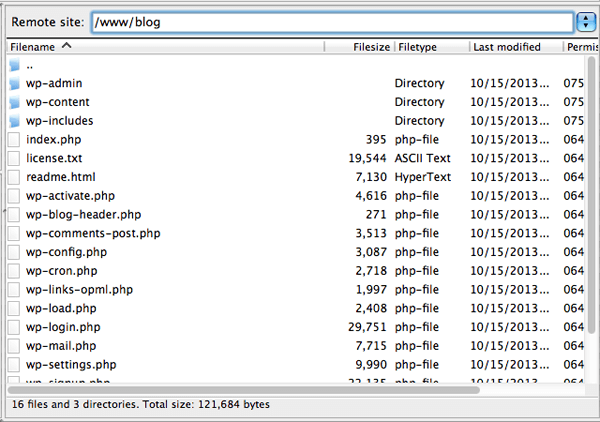
Back up each & every aspect of your WordPress site. This is the best practice before doing any major change, but it is necessary while you are migrating your WordPress installation.
Furthermore, you can also manually back up your site. Just connect to your web host using an FTP program such as FileZilla and copy all files under your website’s directory to a folder on your local computer.
It includes the .htaccess file that is set to be hidden. As .htaccess (hypertext Access file) is the configuration file of a website. This configuring file is used to run Apache Web Server software. Any alteration in this file can cause an error. Restore Support Services.
The Apache Web Server is a popular open-source, cross-platform web server that is, right now the most popular web server in existence. It is actively maintained by the Apache Software Foundation. The Apache web server has modules that add more functions to its software.
Just consult your FTP program help file to have it show hidden files if you are not able to see this file. This could take some time depending on the number of media uploads you have on your site. If you are facing any problems then feel free to avail of our Backup and Restore Support Services.
Step 3: Export WordPress Database
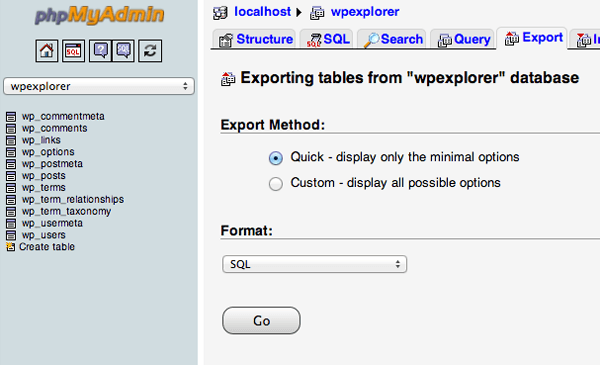
Exporting your database is an easy process that only needs a few steps to complete. Just log in to the cPanel account of your web server and open the phpMyAdmin application. Choose the database containing your WordPress installation from the list on the left-hand sidebar. After selection, click on the Export tab on the navigation menu.
The default settings of a Quick export and the SQL format for the export are adequate for what we require. Tap on the Go button, the database export process will begin and a file will be downloaded to your local computer.
Step 4: Create a WordPress MySQL database on your new host server
Before starting to migrate the WordPress site to a new server, create an environment for a WordPress installation. To manually migrate your WordPress site you need to create a database by which you can import your SQL data.
Just log in to your new web host and connect to the cPanel software. Here we will be using the MySQL database application. Where MySQL in WordPress is a central component in the LAMP stack of open-source web application software which is used to create websites where LAMP stands for Linux, Apache, MySQL, and PHP.
In case your web host doesn’t run this application, then contact their support team and ask for a way to create new databases.
Following are the steps to creating a database:
- The very first, in your hosting account cPanel, open the MySQL database icon and create a new database with a suitable name for your website.
- Next, create a new MySQL database with a secure password.
- You have to add this user account to the new database. It will give you the username that you have created.
- Scroll down to the ‘Add user to a database section and choose the database user that you just have created from the drop-down menu and then choose the database and finally click on the Add Button.
- Now you have successfully created your database with WordPress. Remember that note your database name,
- username, and password. You will require this information soon.
Step 5: Edit the wp-config.php File
To edit the wp-config.php file go to the folder on your computer where you downloaded your website files. Here you will see a file called wp-config.php that regulates the access between WordPress and your database.
Thereafter, copy this file and store it in another folder. In case something goes wrong, so you can restore your changes from here.
Now, again go to the original version of the file and open it and make the three changes that are as follows:
1. Change the database name
Navigate to the following line:
| define(‘DB_NAME’, ‘db_name’); |
At present, you will have to set the db_name portion of the above line to the MySQL database name of your old web host. And this must be changed to the new database name that you have just created.
2. Change the database username
Find the given-below line in your file:
| define(‘DB_USER’, ‘db_user’); |
Here, change the db_user portion from your old host username to match the new username that you just created.
3. Change the database user password
Go to the given-below line in your file:
| define(‘DB_PASSWORD’, ‘db_pass’); |
Here, you will have to change the db_pass portion to the new secure password that you have created for your MySQL users. Now save wp-config.php and close the file.
Step 6: Import Your Database
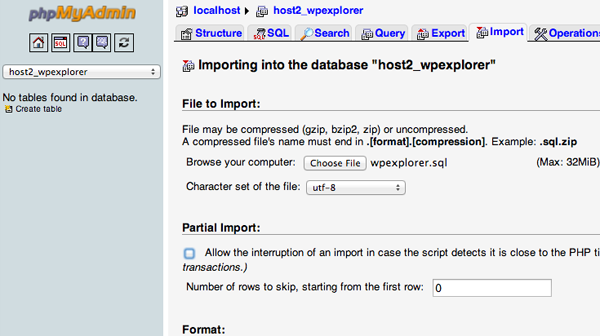
Now that you have a new database to work with it. So let’s start the import process.
To import the data, the very first you will have to launch phpMyAdmin from cPanel on your new server. After that choose the new database from the list on the left sidebar. And finally, click on the Import tab from the Navigation menu.
Now click on the choose file button in the File to Import section and choose the SQL file that you exported previously.
After that, un-check the Partial Import checkbox. Remember that the format is set to SQL and tap the GO button. Doing this your import process will start.
The time depends on your database size. When it has finished you will receive a successful message.
Step 7: Upload your WordPress files to your new host
You have configured the wp-config.php file and prepared your new database, it’s time to start uploading your site’s file.
By using the FTP program, connect to your new web host and go to the folder where your site going to be held. In case this is the primary or only site being installed on this Web Server then uploading the files to the public_html folder is the usual directory.
With remote directory selection, upload your site’s files in which an updated version of the wp-config.php PHP file is included. With the first download, this process can take some time.
Once the upload is finished, don’t delete these files from the local computer. They might be required until the final step has been completed.
Step 8: Linking to new URL and defining new domain
In case you migrate a WordPress site to a new domain name, then read this step otherwise you can skip it.
While migrating a site most people face issues that they’ve added links to other posts on their website and inserted images straightly by pointing to a URL on the server. And causing these to break when moved over to a new domain.
By using Search Replace DB script on GitHub, you can search easily for any instances of your old domain name and replace it with the name. Remember that once you have done it, then delete it (for security reasons), and don’t keep it in your root domain. Create a temp folder with a random name to host the script.
Changing Site URL
By doing a search and replacing the old domain with the new domain you can also change site_url and home_url values in your database. However, changing the site URL ensures that while you are trying to log in on the new domain, it does not try and redirect you to your old domain.
Step 9: Reconfiguration of your wp-confing.php files
Reconfigure the settings of your domain’s DNS before using the new host site. Because they will be set to the point of your old host and you will have to point the right record to the new server IP address.
This process relies on where you have your domain registered. However, the registrar of your domain should have all the details that you need to make this change. Basically, all the details required for completing this process are too varied to discuss in this post.
Remember that DNS changes can take 48 hours to complete this process. If you expect lower levels of traffic, doing this is great for a period of time. Remember that DNS changes mean 48 hours window, don’t make any changes to your site because doing this can affect the old version of the site.
After 48 hours of process, you will be accessing the new web host when you go to your site. Also, you can connect to your old web host by deleting files and databases. Remember that you should have a duplicate copy of these files and a database of the original wp-config.php file.
Now let’s discuss migrating the WordPress site to a new host using a Plugin.
Migrate WordPress site to new hosting using a plugin
As we have discussed above in the first step, once you have purchased your new host, then don’t install WordPress (blogging platform). We will do that in our later steps. Now, your new web host account should be completely empty with no files or folders in your main directory or attributes. Thereafter:
Step 1. Setting Up Duplicator Migration Plugin
Duplicator migrates WordPress plugin is a free plugin and the best way to migrate a WordPress site. We always recommend to all because by using this you can migrate your site with no downtime and without losing your site potential.
The very first install and activate the free Duplicator plugin on a website that you want to move to a new URL. You can see our guide on How to Install a WordPress Plugin.
After you have installed and activated the Duplicator plugin in your cPanel, then go to the Duplicator>>Packages section in your WordPress admin area, which we arrive at in this blog step.
Now, go to the top right-center and click the “Create New” button.
[The image illustrated below is attached from the source – wpbeginner.com]
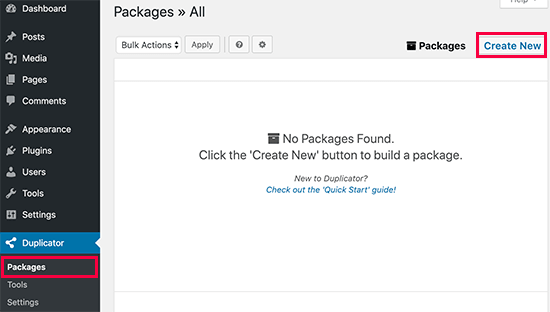
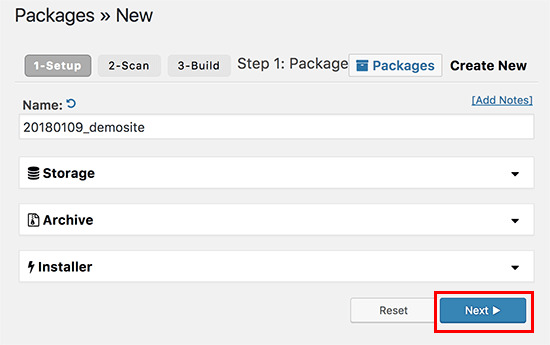
Thereafter, click the Next button and follow the steps to create your packages.
Remember that check out your scan results (each & every button should good) and then click on the Build button.
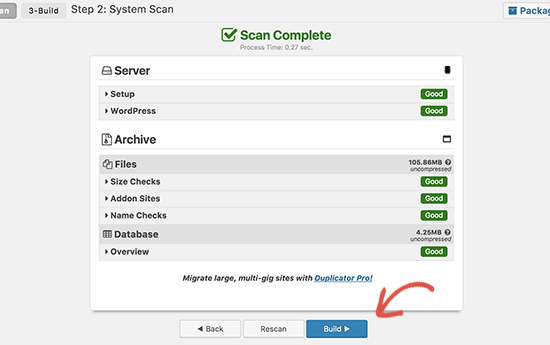
This process may take several minutes to complete down the process, so leave the tab open so that the plugin does its task.
After completing the process, then you need to download both the Installer and Archive package, click the “One-click download” link and download both files.
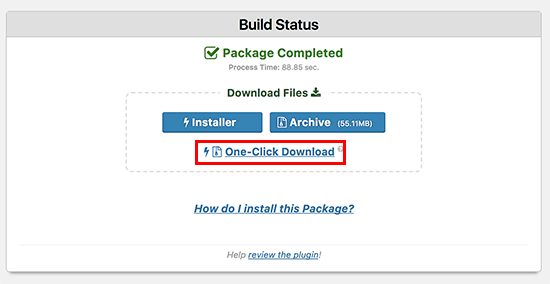
The archive file is the entire copy of your site, and the installer file will automatically the installation process.
Step 2: Import Your WordPress Site to New Host
Now you have downloaded both the archive and installer files in your Site panel, thereafter, it’s time to upload them to your new web host and servers.
By using an FTP client, connect to your new web host. While connecting your FTP client, you will have to enter your site domain name as a host.
However, your domain name is still indicating to your old host, so by entering the IP address of your server or server hostname, you will have to connect it. You can also get this information from your new hosting account’s cPanel dashboard.
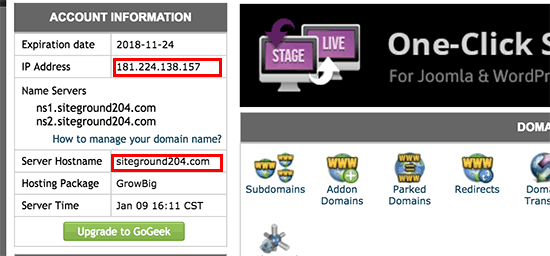
Upload both the installer.php and archive.zip files to the root directory of your site. Usually, this is /username/public_html/folder.
You can also ask your web hosting company in case of an issue.
Remember that your root directory should be completely empty because many web hosting companies install WordPress automatically when you sign up.
If you have installed WordPress already in your root directory, then delete it. Thereafter, upload both the archive zip file and the installer.php file to the root directory of your site.
Step 3: Change the hosts’ file for preventing the downtime
After uploading both files to your new host, access the installer.php file in a browser.
The file can be accessed using a URL like given below:
| http://www.example.com/installer.php |
But the main problem is this URL will take you to your old web host, and you will get a 404 error as your domain name is indicating to your old web host.
Generally, some other tutorial might tell you to change your domain nameservers and point to your new host. But this will result in your users seeing a broken site as you move it.
We’ll show you how you can access your new site temporarily on your computer without affecting your old site. This can be done with a host file on your computer.
The hosts’ file maps WordPress domain names to particular IP addresses. Now let’s have a look at how we can add an entry for your domain name in the host’s file so that it indicates your new hosting company.
How to add an entry for your domain name in the host file?
The below steps will show how to point to your new host, but only when using your computer. The changes will authorize you to access the files on your new host using your own domain name, but the rest of the world will, however, access your site from the old host.
Firstly find the IP address of your new web hosting server. For finding this log into your cPanel dashboard and click on expand stats link in the left-hand sidebar. This will extend the sidebar displaying information about the status of your server. The information you should copy is the Shared IP Address.
Here, Windows users need to go to Programs>>All Programs>>Accessories, press right-click on Notepad, and choose Run as Administrator. Here, you will see a Windows UAC, click on the “Yes” button to launch Notepad with administrator privileges.
On the Notepad screen, visit File>>Open and then go to C:\Windows\System32\drivers\etc. And choose the host’s file and open it.
Mac users need to open the Terminal app and enter this command to edit the host’s file: Sudo nano /private/etc/hosts
For Windows and as well as Mac users, enter the IP address you copied and then enter your domain name. Like: 192.168.1.22 www.example.com.
Remember that replace your IP address with your copy from cPanel and example.com with your own domain name.
Save all your changes and you can now access your files on the new host using your domain name on your computer.
Step 4: Create MySQL Database on Your New Host
Here, you have to create your MySQL database. To create it – go to step 4 we have mentioned above, and create it successfully.
Step 5: Start the Duplicator migration process
For the WordPress Duplicator Migration Process, go to the given-below address in your browser window, and replace example.com with your domain name:
| http://www.example.com/installer.php |
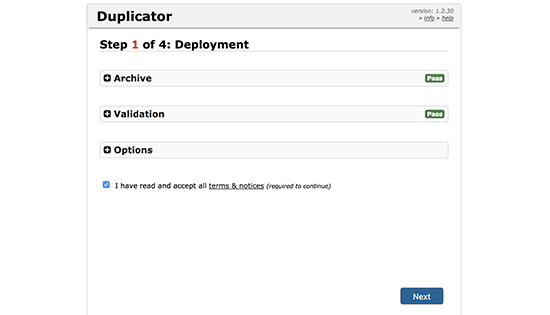
Now the installer will run a few tests and appear you “Pass” and you will appear next to validation and validation tests.
Check the terms & conditions checkbox. Then click the Next button to continue.
Afterward, enter the database details that you have created in the previous step such as MySQL host, database name, username, and password.
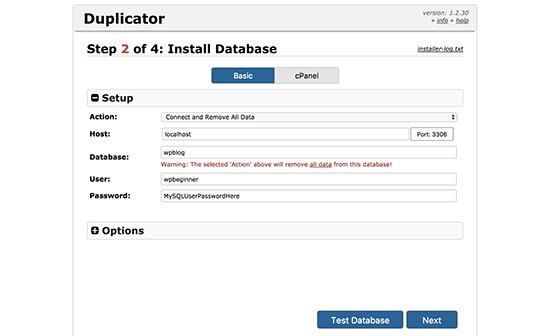
Click the “Test Database” button after entering the right information. If this Duplicator plugin connects, then you will be able to see a string starting with Pass. Else, you get database connection error details.
If this plugin connects, then press the Next button to continue.
Here Duplicator will start to import your WordPress database from the archive.zip into your new database.
The next window will ask you to update the URL or Path. In case you do not change the domain name so you don’t need to make any changes here. Just click the Next button to continue.
Finally, this plugin runs the final step and shows you the login button.
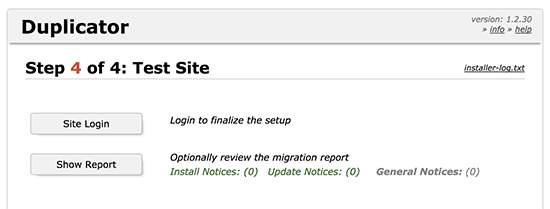
Now, you can log in to your WordPress site on the new host.
Step 6: Update Your Domain Name Server (DNS)
Despite created the entire copy of your WordPress files and database on your new server, still, your domain indicating your old web hosting account. Hence, update your domain name with the following given below steps:
For updating your domain, switch your DNS nameservers. This assures that your users are taken to the new location of your website when they type your domain into their browsers.
If you want to register your domain name with your hosting provider, then it’s good to transfer the domain to the new host. And in case of using a domain registrar like Godaddy, Namecheap, etc, then update your nameservers.
You should have the nameserver information from your new web host. Generally, this is a couple of URLs that something looks like this:
- ns1.hostname.com
- ns2.hostname.com
Look for the domain management area and then look for nameservers. If you need any help with updating your nameservers, you can ask your web hosting company. Here we will show you how to change DNS with GoDaddy.
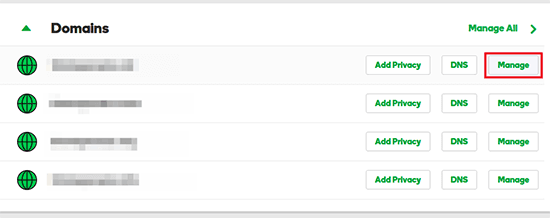
The very first, login to your Godaddy account and click on the Domains.
On the next screen, tap on the Manage button that is next to the domain name that you want to change.
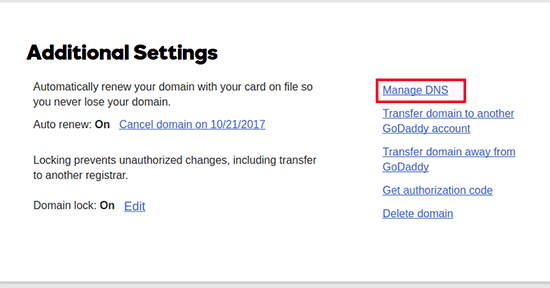
You have to click on ‘Manage DNS’ to continue under the ‘Additional DNS’.
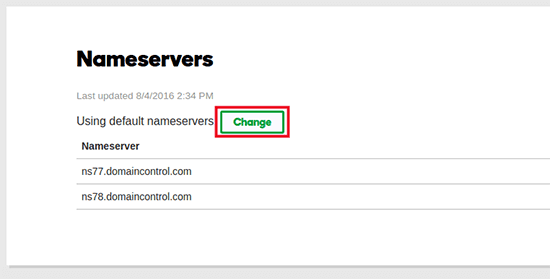
Thereafter, click on the change button by scrolling down to the nameserver section.
Here, change the nameserver type dropdown from ‘Default’ to ‘Custom’. Thereafter, fill out your new hosting provider’s information under the nameserver.
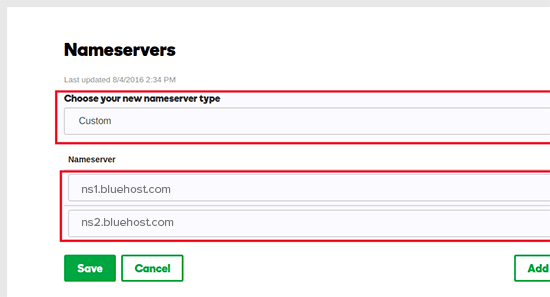
Click the Save button to store your changes.
Finally, you have changed successfully your domain’s nameserver. Make sure that DNS changes may take 4-48 hours for the whole process.
In case you have the same content on your old host as well as on your new host, so your visitors will not see any difference. And your WordPress migration will be faultless with no downtime. We recommend you secure – Wait to cancel your old hosting account until 7 days after you migrate the WordPress site to a new URL.
That’s it! Now let’s discuss how to migrate the WordPress site to a new domain.
How to move a WordPress site to a new domain?
Due to any reason your site performing slowly or you want to change your domain name, you can. But it is a bit more difficult than migrating to a new host. Let’s consider an example;
Some time Mark Zuckerberg (Facebook founder) changed the Facebook domain name – TheFacebook.com to Facebook.com. But he could not just delete the “The” from Thefacebook.com. He has to change the complete domain name.
Means to say, migrating a domain name is not deleting or adding characters. You need to change some database information and migrate files properly.
Now take a look at how to migrate a WordPress site to a new domain;
Step 1: Buy a domain name registration
The very first create a domain name in your hosting account, thereafter search from available domains and buy the one that meets your requirements from the third-party registrar. Or by choosing a hosting provider (that allows you to control your domain registration at signup) you can skip the middleman.
# Note that your new domain host should be WordPress website supported.
Step 2: Migrate your WordPress site files
Now, login to your cPanel file manager and copy the complete public_html files from the site that you want to migrate and go to your new domain file manager and paste the public_html file here.
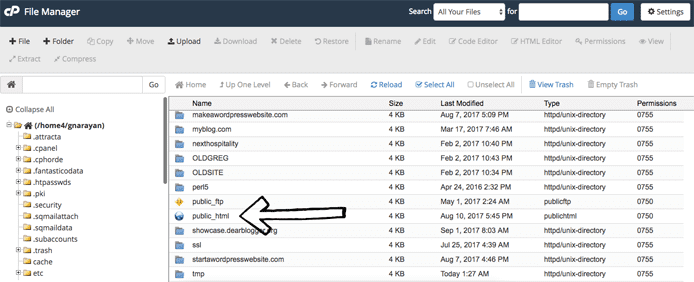
Now you will have two copies of the same website at two different locations. Thereafter, go to your phpMyAdmin account.
Now, on the left side search the directory labeled “wrap” that is associated with your old domain name. If you are an owner and operate several domains, it can be difficult at first.
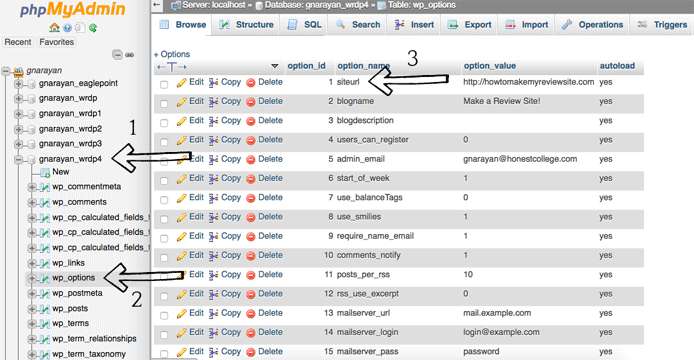
Now press the click button next to your domain to expand options. Thereafter press the “wp_options” button and at the top in the section labeled “siteurl” press the pencil icon to edit. Change the old URL to the new one in the middlebox and press the “Save” or “Go” button.
Step 3: De-Index URLs of the old domain site
Now you have successfully migrated the WordPress site to a new domain name, but still, people can access your site at your old domain name. To resolve it, you need to install a plugin like WordPress Yoast SEO on the old site. And de-index all URLs from the search engines of the old site.
Migrating WordPress Site to a new server
It is good and also bad news when you want to migrate your WordPress site to a new (upgraded) server.
The good news is: It’s simple to migrate the site to a new server. Most of the hosts will upgrade servers and also migrate each & everything. You will simply pay them the difference.
The bad news: Your current server is slow, it’s not getting the work done, it’s too expensive, or too cheap, maybe it got hacked, or maybe it would let you host a number of domains or it is not equipped with cPanel. These all are bad news, so, hopefully, it does not apply to you.
After all, if you want to move to a new host together as part of your server migration, so here we have discussed it above. To recap, take a look at the given below steps to migrate your site itself:
Step 1: The very first, login to your cPanel, and throughout the file manager backup your file. Thereafter export your database via phpMyAdmin.
Step 2: Make a new database on your new host server. And edit the wp-config file to contain the login credentials and new database name. Now import your saved database and upload your WordPress files.
Step 3: Make sure that your DNS settings are in place, and before canceling your shared hosting account or shutting down your old server conduct a final QA.
Some other best plugins to migrate a WordPress site to a new host
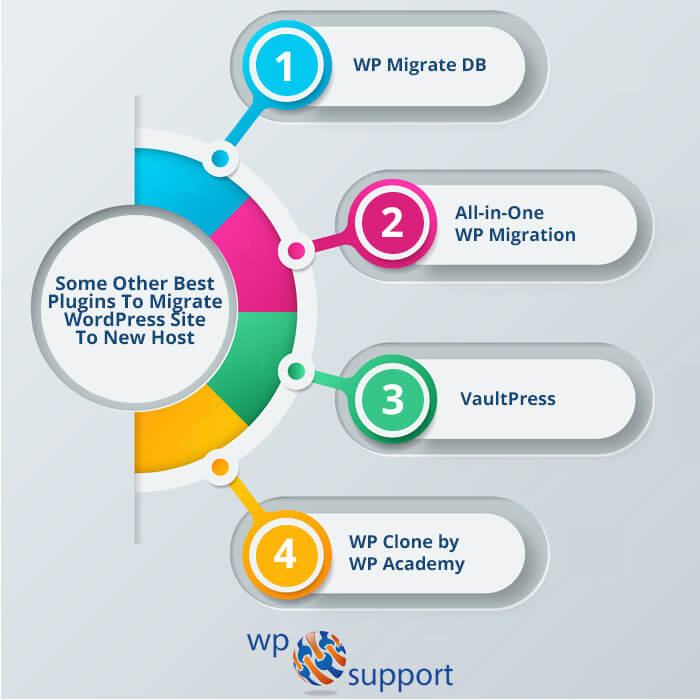
Best WordPress Migration Plugins – 2024
1. WP Migrate DB
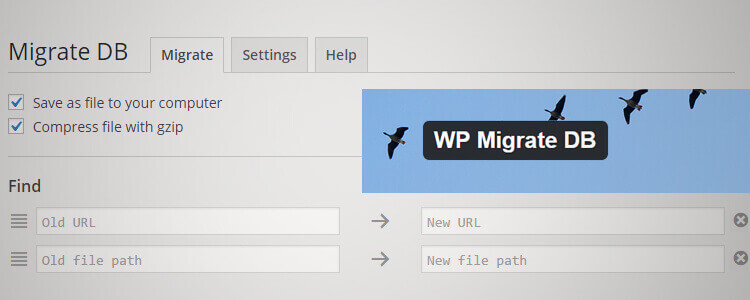
WP Migrate DB is focused completely on your WordPress database. If you’ve ever tried to manually move a WordPress site, you know that the database is the most irritating part. Generally moving your other files is a matter of copying and pasting but moving the database that can get tricky.
WP Migrate DB makes it easy by finding and replacing URLs and file paths. This is important if you migrate a WordPress site to a new URL. Like in case you’re migrating a production version of your website to your localhost for testing, you’ll require updating all of the URL paths for matching your localhost. And this plugin does that for you.
If you’re hands-on or a WordPress developer and don’t mind copying your other files manually, WP Migrate DB is the best option.
2. All-in-One WP Migration

It is a free plugin with premium extensions that is completely focused on moving your site to a new server or domain name. It covers moving your database and your files, which means it handles all aspects of migration.
All-in-One WP Migration makes use of some marvelous tricks to ensure that it works for all hosting providers. Firstly it exports/imports data in 3-second time chunks, which lets it bypass any restrictions placed by your host. It does something similar to upload sizes, so even if your host restricts uploads to a certain max, All-in-One WP Migration will still be able to move your site.
If you require changing your domain name, All-in-One WP Migration lets you do unlimited find/replace operations on your database and will resolve any possible serialization issues to make sure that everything works smoothly.
The free version of this plugin supports moving sites up to 512MB in size. If your site is any bigger, you’ll require going with the unlimited version, which removes the size limit.
They also have extensions that can help move your site to cloud storage providers, for example, Dropbox or Google Drive.
3. VaultPress

It comes straight from Automattic, the company behind WordPress. VaultPress backs up and protects every part of your WordPress site. After you have a backup, it’s quite easy to clone your site to a new location with VaultPress Restore to a different Site tool.
But for this, you need to enter your FTP details and domain name if you’re changing domain names VaultPress will handle the rest.
The drawback of using this plugin is that it’s a subscription service. However, it is part of Jetpack. So that subscription payment will literally get you access to all of the other premium Jetpack features as well.
4. WP Clone by WP Academy

WP Clone is an excellent migration plugin with one major differentiating factor as you don’t have to muck around your FTP program for handling your migration.
All you require to do is create a fresh WordPress install at the location where you wish to clone your WordPress site.
Then after you just require to install the WP Clone plugin on your fresh install and it will handle the migration for you. If you don’t know about installing the plugin then have a look at our article on How to install a plugin in WordPress.
If your website is large, you should go with a different migration plugin. Smaller sites (under 250MB) are more likely to move through the WP Clone.
Conclusion
Through this guide, we have tried to put light on various migration scenarios and which migration plugin you should select to migrate your site to a new host. If you really want to accomplish the same, then WordPress migration tends to ease the task with no or minimal loss to your site.
Well, we hope that this article truly helps you while migrating a website to a new server. If you have any query related to WordPress Site migration then refer to our WordPress support blog. You can also call to our 24/7 helpline number +1-888-738-0846 (toll free).
Thanks!
